43. Multi-Master SPI Communication
The standard SPI protocol is designed for single-master and multiple-slave communication.
In a multi-master SPI setup, there can be more than one master, but special precautions must be taken for bus arbitration to ensure that only one master communicates at a time.
To handle bus arbitration and avoid data transfer conflicts in a multi-master SPI setup, here's how we can manage the SPI bus:
Key Steps for Bus Arbitration in Multi-Master SPI:
- Disabling the SPI Bus After a Master Completes its Work:
- After a master finishes its communication, it must release control of the SPI bus so that the other master can access it.
- To disable the master from the SPI bus, set all SPI pins (MOSI, MISO, SCK, and CS) to input and state LOW. This puts the pins in high-impedance mode, effectively disconnecting them from the bus.
- An external pull-up resistor should be connected to ensure the CS pin doesn't float and make the line HIGH.
- Re-enabling the SPI Bus When a Master Needs to Interface:
- The code waits until the chip select pin (CS_PIN) goes HIGH, indicating that the peripheral device is ready for communication.
- Before a master can send or receive data, it must re-enable the SPI interface by setting the necessary pins as output.
- MOSI, SCK, and CS pins must be set as outputs for the master to communicate with the slave.
- The CS pin for the slave should be pulled low to select the slave for communication.
By properly managing when and how masters disable and enable the SPI bus, conflicts between masters can be avoided, allowing safe communication in a multi-master SPI setup.
Hardware Connections
Let's go through the hardware connections step by step.
- Ensure Proper Power Supply: Connect 3V/5V and GND from the microcontroller to the SD card module to power it correctly.
- Pull-up Resistors for Buttons: The buttons are connected with pull-ups/pull-downs.
- SPI Communication: The MOSI, MISO, SCK, and CS lines are shared between two microcontroller masters and the SD card. Each master can use these lines to communicate with the SD card, depending on who is active and controlling the bus.
By following these steps, we will have a setup where two microcontroller boards (masters) can communicate with an SD card module (slave) using SPI, with proper handling of bus arbitration.
What if Voltage Levels Are Different?
- SPI signals (SCK, MOSI, MISO, CS) are digital logic signals. If the two microcontrollers operate at different logic voltages (e.g., 5V Arduino as Master and 3.3V ESP32 as Slave), a direct connection can damage the lower-voltage device or cause unreliable communication.
- Example Scenario
- Arduino UNO (5V) → ESP32 (3.3V):
- Arduino's output HIGH = 5V, which exceeds ESP32’s max 3.3V input tolerance, risking permanent damage.
- Arduino UNO (5V) → ESP32 (3.3V):
- Solutions
- Level Shifter IC (Preferred)
- Use bidirectional level shifters for MOSI, MISO, and SCK lines.
- Voltage Divider (for MOSI & SCK going to 3.3V device)
- Example: Two resistors (e.g., 10kΩ & 20kΩ) to step down 5V → 3.3V.
- Use 3.3V Logic-Compatible Devices (Simplest)
- If possible, select both microcontrollers that operate at the same voltage level.
- Level Shifter IC (Preferred)
Important: The CS/SS line also needs level shifting if coming from a higher voltage device.
By considering the above points, we are going to implement the given task with following the controllers.
- ESP32
- Arduino UNO
We are using the ESP32 DevKitC v4 development board and programming it using the Arduino IDE.
- Before uploading, make sure to select “ESP32 Dev Module” as the board to ensure correct settings and compatibility.
Solution of the given task
- ESP32 as Master 1
- ESP32 as Master 2
A) ESP32 as Master 1
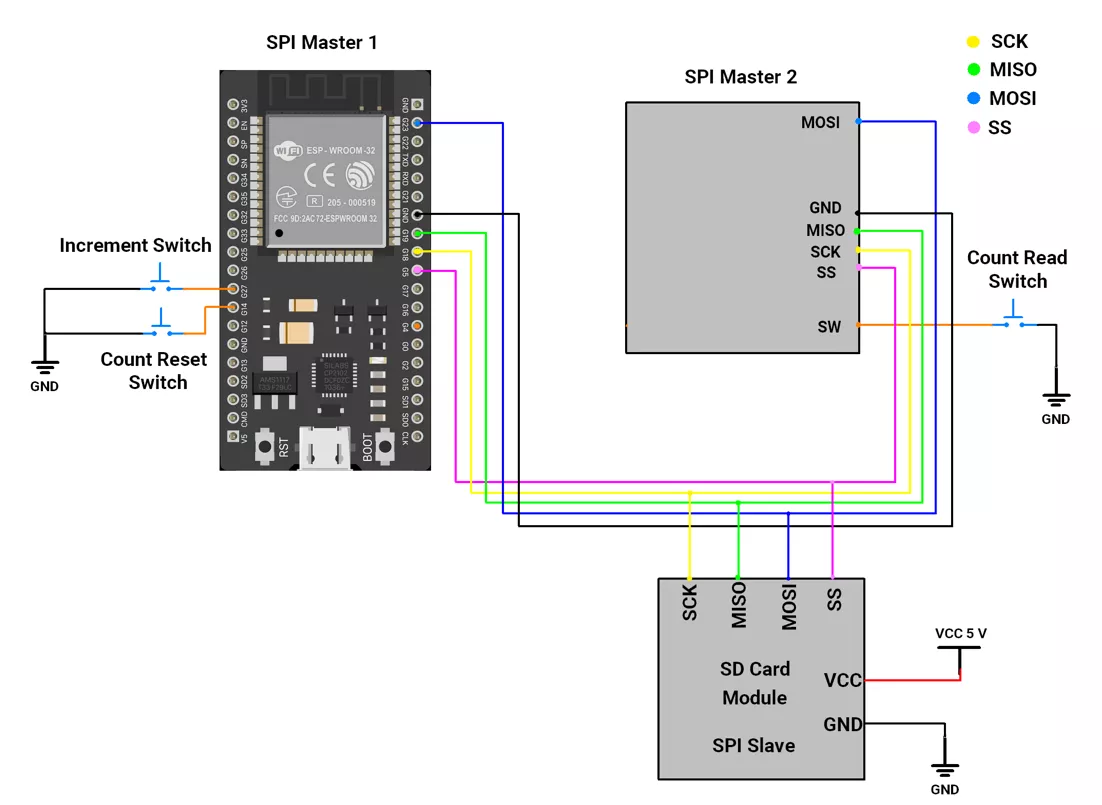
Circuit Connection
- Interfacing of a push button switch
- GPIO pin 27 → Increment Switch
- GPIO pin 14 → Reset Switch
- Interface Master 1 SPI pins to the slave SD card and Master 2 SPI pins.
- GPIO PIN 18 → SCK
- GPIO PIN 19 → MISO
- GPIO PIN 23 → MOSI
- GPIO PIN 5 → CS/SS
Circuit Connection
Firmware Implementation
In the ESP32 Master 1 codes, the SPI.h library is used for SPI communication.
Master 1 Code
#include <Arduino.h>
#include <SPI.h>
#include <SD.h>

// ESP32 VSPI Pins
#define CS_PIN 5     // Chip Select for SD card
#define SCK_PIN 18   // SPI Clock
#define MISO_PIN 19  // Master In Slave Out
#define MOSI_PIN 23  // Master Out Slave In

// Button Pins
#define SWITCH_INC 15  // Increment button (active LOW)
#define SWITCH_RST 4   // Reset button (active LOW)
#define DEBOUNCE_DELAY 50

// Globals
uint8_t counter = 0;
unsigned long lastDebounceTime[2] = { 0, 0 };
uint8_t lastButtonState[2] = { HIGH, HIGH };
uint8_t buttonState[2] = { HIGH, HIGH };
uint8_t switchPins[2] = { SWITCH_INC, SWITCH_RST };
const char* FILE_NAME = "/count.txt";  // SD file name

SPIClass spi(VSPI);  // Use VSPI hardware SPI bus

// Function Declarations
void enableSPI();
void disableSPI();
void initSDCard();
uint8_t readCounterFromSD();
void writeCounterToSD(uint8_t count);
bool isButtonPressed(uint8_t switchIndex);

// Setup
void setup() {
  Serial.begin(115200);
  delay(200);
  Serial.println("\n[ESP32] Counter + SD Card");

  for (uint8_t i = 0; i < 2; i++) {
    pinMode(switchPins[i], INPUT_PULLUP);
  }

  //counter = readCounterFromSD();
  Serial.print("Initial counter value: ");
  Serial.println(counter);
}

// Main Loop
void loop() {
  // Increment counter
  if (isButtonPressed(0)) {
    Serial.println("\nIncrement button pressed.");
    counter = readCounterFromSD();
    Serial.print("Initial counter value: ");
    Serial.println(counter);
    counter++;
    writeCounterToSD(counter);
    Serial.print("Counter incremented to ");
    Serial.println(counter);
  }

  // Reset counter
  if (isButtonPressed(1)) {
    Serial.println("\nReset button pressed.");
    counter = 0;
    writeCounterToSD(counter);
    Serial.println("Counter reset to 0.");
  }
}

// SD Card Functions
uint8_t readCounterFromSD() {
  uint8_t storedCounter = 0;
  initSDCard();

  if (SD.exists(FILE_NAME)) {
    File file = SD.open(FILE_NAME, FILE_READ);
    if (file) {
      storedCounter = file.parseInt();
      file.close();
      Serial.println("Counter read from SD card.");
    } else {
      Serial.println("Error: Failed to read file.");
    }
  } else {
    Serial.println("No counter file found. Starting with counter = 0.");
  }

  disableSPI();
  return storedCounter;
}

void writeCounterToSD(uint8_t count) {
  initSDCard();

  if (SD.exists(FILE_NAME)) {
    SD.remove(FILE_NAME);
    Serial.println("Old counter file deleted.");
  }

  File file = SD.open(FILE_NAME, FILE_WRITE);
  if (file) {
    file.print(count);
    file.close();
    Serial.println("Counter updated on SD card.");
  } else {
    Serial.println("Error: Failed to write to SD card.");
  }

  disableSPI();
}

void initSDCard() {
  enableSPI();
  Serial.println("SD card initializing...");
  while (!SD.begin(CS_PIN, spi)) {
    Serial.print(".");
    delay(1000);
  }
  Serial.println("\nSD card initialized.");
}

// SPI Management
void enableSPI() {
  Serial.println("Enabling SPI...");
  Serial.println("Waiting for free the SPI bus. ");
  // while (!digitalRead(CS_PIN))  // Wait until the chip select pin is LOW
  // {
  //   Serial.print(".");
  //   delay(1000);
  // }
  spi.begin(SCK_PIN, MISO_PIN, MOSI_PIN, CS_PIN);  // VSPI on ESP32
  pinMode(CS_PIN, OUTPUT);
  digitalWrite(CS_PIN, HIGH);
  Serial.println("SPI Enabled.");
}

void disableSPI() {
  SD.end();
  spi.end();

  pinMode(MOSI_PIN, INPUT);
  pinMode(MISO_PIN, INPUT);
  pinMode(SCK_PIN, INPUT);
  pinMode(CS_PIN, INPUT);

  Serial.println("SPI Disabled (pins in Hi-Z).");
}

// Debounce
bool isButtonPressed(uint8_t switchIndex) {
  uint8_t pin = switchPins[switchIndex];
  int reading = digitalRead(pin);

  if (reading != lastButtonState[switchIndex]) {
    lastDebounceTime[switchIndex] = millis();
  }
  lastButtonState[switchIndex] = reading;

  if ((millis() - lastDebounceTime[switchIndex]) > DEBOUNCE_DELAY) {
    if (reading != buttonState[switchIndex]) {
      buttonState[switchIndex] = reading;
      if (buttonState[switchIndex] == LOW) {
        return true;
      }
    }
  }
  return false;
}
Code Explanation
Setup
- Serial starts at 115200 baud for debugging.
- Two buttons:
SWITCH_INC (GPIO 27)→ increment counter.SWITCH_RST (GPIO 14)→ reset counter.
Both use INPUT_PULLUP (active LOW).
- VSPI (pins: SCK 18, MISO 19, MOSI 23, CS 5) used for SD card communication.
- On startup → reads /count.txt from SD → loads saved counter (defaults to 0).
Loop
- If Increment button pressed → counter ++ → write new value to SD.
- If Reset button pressed → counter = 0 → update SD file.
- Each action prints status to Serial Monitor.
SD Card Operations
readCounterFromSD()→ mounts SD, reads integer from /count.txt, returns 0 if missing.writeCounterToSD()→ deletes old file, writes updated counter value, then unmounts.- Ensures data is saved persistently across resets.
SPI Management
enableSPI()→ initialises VSPI bus, sets CS HIGH (idle), prepares pins for communication.disableSPI()→ ends SD & SPI sessions and sets SPI pins to Hi-Z (INPUT) to prevent bus conflicts.
Button Debounce
isButtonPressed()→ checks each button separately with 50 ms debounce.- Detects a stable LOW press only once per button activation.
B) ESP32 as Master 2
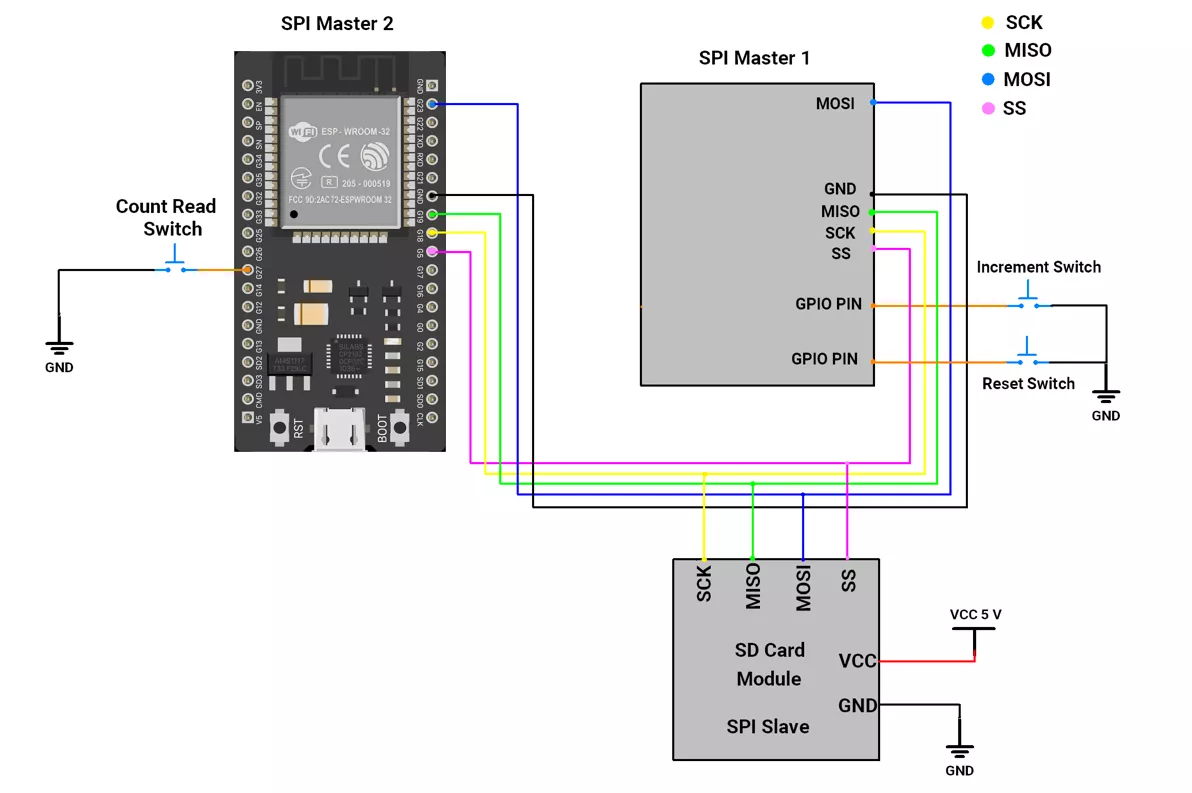
Circuit Connection
- Interfacing of a push button switch
- GPIO pin 27 → Count Read Switch
- Interface Master 2 SPI pins to the slave SD card and Master 1 SPI pins.
- GPIO PIN 18 → SCK
- GPIO PIN 19 → MISO
- GPIO PIN 23 → MOSI
- GPIO PIN 5 → CS/SS
- Connect Master 1 and Master 2 GPIO pin 4 through a 4.7KΩ pull-up resistor.
Circuit Connection
Firmware Implementation
In the ESP32 Master 2 code, the SPI.h library is used for SPI communication.
Master 2 Code
#include <Arduino.h>
#include <SPI.h>
#include <SD.h>

//  ESP32 VSPI Pins
#define CS_PIN 5     // Chip Select for SD card
#define SCK_PIN 18   // SPI Clock
#define MISO_PIN 19  // Master In Slave Out
#define MOSI_PIN 23  // Master Out Slave In

//  Button
#define SWITCH_PIN 15  // Button input pin (active LOW)
#define DEBOUNCE_DELAY 50

//  Variables
uint8_t counter = 0;
unsigned long lastDebounceTime = 0;
uint8_t lastButtonState = HIGH;
uint8_t buttonState = HIGH;

const char* FILE_NAME = "/count.txt";  // File used to store counter

SPIClass spi(VSPI);  // Use VSPI hardware SPI bus

//  Setup
void setup() {
  Serial.begin(115200);
  delay(200);
  Serial.println("\n[ESP32] SD Card Counter Reader");

  pinMode(SWITCH_PIN, INPUT_PULLUP);

  // counter = readCounterFromSD();  // Read counter from SD at startup
  // Serial.print("Counter value: ");
  // Serial.println(counter);
}

//  Loop
void loop() {
  if (isButtonPressed()) {  // Check button with debounce
    Serial.println("\nRead button pressed.");
    uint8_t count = readCounterFromSD();  // Read counter from SD
    Serial.print("Stored count is: ");
    Serial.println(count);
  }
}

//  Read counter value from SD
uint8_t readCounterFromSD() {
  uint8_t storedCounter = 0;
  initSDCard();

  if (SD.exists(FILE_NAME)) {
    File file = SD.open(FILE_NAME, FILE_READ);
    if (file) {
      storedCounter = file.parseInt();
      file.close();
      Serial.println("Counter read from SD card.");
    } else {
      Serial.println("Error: Failed to read file.");
    }
  } else {
    Serial.println("No counter file found. Starting with counter = 0.");
  }

  disableSPI();
  return storedCounter;
}

//  Initialize SD card
void initSDCard() {
  enableSPI();

  Serial.println("SD card initializing...");
  while (!SD.begin(CS_PIN, spi)) {
    Serial.print(".");
    delay(1000);
  }
  Serial.println("\nSD card initialized.");
}

//  Enable SPI
void enableSPI() {
  Serial.println("Enabling SPI bus...");
  Serial.println("Waiting for free the SPI bus. ");
  while (!digitalRead(CS_PIN))  // Wait until the chip select pin is LOW
  {
    Serial.print(".");
    delay(1000);
  }
  spi.begin(SCK_PIN, MISO_PIN, MOSI_PIN, CS_PIN);  // ESP32 VSPI setup

  pinMode(CS_PIN, OUTPUT);
  digitalWrite(CS_PIN, HIGH);
  Serial.println("SPI Enabled.");
}

//  Disable SPI
void disableSPI() {
  SD.end();
  spi.end();

  pinMode(MOSI_PIN, INPUT);
  pinMode(MISO_PIN, INPUT);
  pinMode(SCK_PIN, INPUT);
  pinMode(CS_PIN, INPUT);

  Serial.println("SPI Disabled (pins set to Hi-Z).");
}

//  Debounce function
bool isButtonPressed() {
  int reading = digitalRead(SWITCH_PIN);

  if (reading != lastButtonState) {
    lastDebounceTime = millis();
  }
  lastButtonState = reading;

  if ((millis() - lastDebounceTime) > DEBOUNCE_DELAY) {
    if (reading != buttonState) {
      buttonState = reading;
      if (buttonState == LOW) {
        return true;  // valid press
      }
    }
  }
  return false;
}
Code Explanation
Setup
- Serial starts at 115200 baud for debugging.
- Button (GPIO 27) set as INPUT_PULLUP — active LOW.
- Creates VSPI bus (SCK 18, MISO 19, MOSI 23, CS 5).
- On startup, calls
readCounterFromSD()→ initialises SD, reads /count.txt, prints stored counter.
Loop
- Checks the button using
isButtonPressed()with 50 ms debounce. - When pressed, → reads counter from SD again and prints it.
SD & SPI Handling
initSDCard()→ enables SPI, retriesSD.begin()until card mounts.readCounterFromSD()→ opens /count.txt, reads integer value, defaults to 0 if missing.disableSPI()→ ends SPI, sets pins to Hi-Z (INPUT) to avoid bus conflicts.
Button Debounce
- Confirms a stable LOW press once every 50 ms, filters noise, and returns true only once per press.
We are using the Arduino UNO development board and programming it using the Arduino IDE.
- Before uploading, make sure to select “Arduino UNO” as the board to ensure correct settings and compatibility.
In both Arduino UNO master and slave codes, the SPI.h library is used for SPI communication.
SPI Pins Of Arduino UNO
- SCK → 13
- MISO → 12
- MOSI → 11
- SS → 10
Solution of the given task:
- Arduino UNO as Master 1
- Arduino UNO as Master 2
A) Arduino UNO as a Master 1
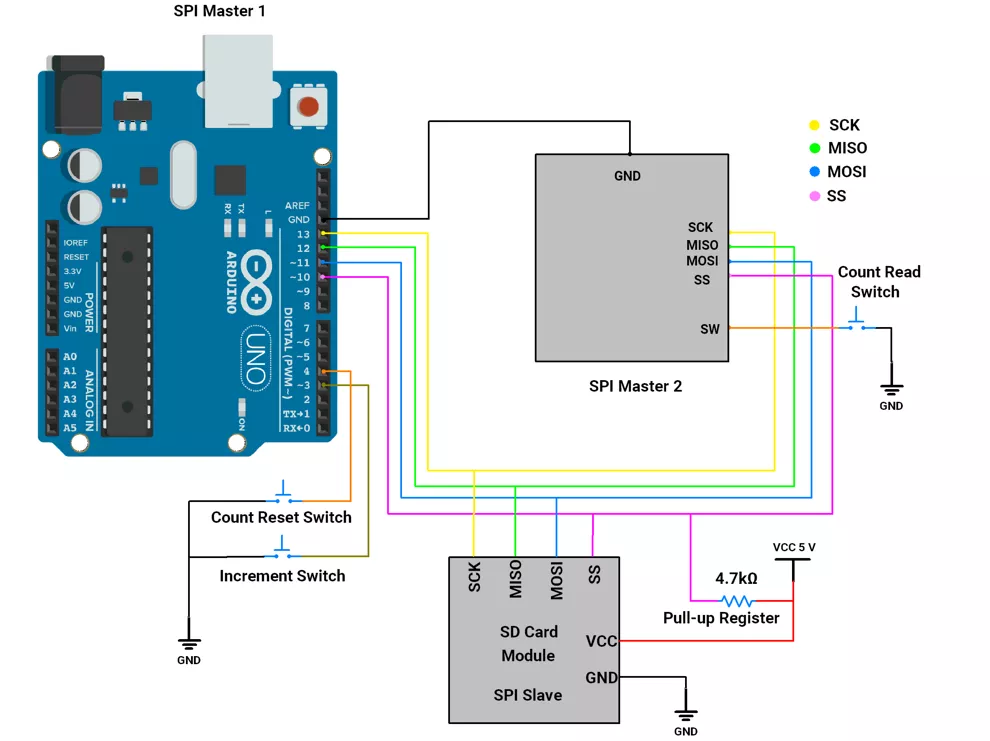
Circuit Connection
- Interfacing of push button switch
- GPIO pin 3 → Increment Switch
- GPIO pin 4 → Reset Switch
- Interface Master 1 SPI pins to the slave SD card and Master 2 SPI pins.
- GPIO PIN 18 → SCK
- GPIO PIN 19 → MISO
- GPIO PIN 23 → MOSI
- GPIO PIN 5 → CS/SS
- Connect Master 1 and Master 2 CS/SS through a 4.7KΩ pull-up resistor.
Circuit Connection
Firmware
As we have Master 1 and Master 2, so we have to develop two different codes.And below points, we have to take care of the codes.
- Debouncing Logic: Ensures stable button press detection.
- SD Card Persistence: Stores the counter value even after the Arduino is powered off.
- SPI Arbitration: Ensures the SPI bus is correctly managed by enabling/disabling SPI communication as needed.
- Modular Code: Separate functions for SPI handling, SD card operations, and button debouncing make the code reusable and maintainable.
Code(Master 1)
#include <SPI.h>
#include <SD.h>

#define CS_PIN 10
#define SWITCH_INC 3
#define SWITCH_RST 4
#define DEBOUNCE_DELAY 50

uint8_t counter = 0;
unsigned long lastDebounceTime[2] = {0, 0};         // Last debounce time for each button
uint8_t lastButtonState[2] = {HIGH, HIGH};          // Last recorded state of each button
uint8_t buttonState[2] = {HIGH, HIGH};              // Current state of each button
uint8_t switchPins[2] = {SWITCH_INC, SWITCH_RST};   // Array to store button pins
const char* FILE_NAME = "count.txt";                // File name for storing the counter on the SD card

void setup() {
    Serial.begin(115200);
    for (uint8_t i = 0; i < 2; i++) {
        pinMode(switchPins[i], INPUT_PULLUP);
    }

    counter = readCounterFromSD();                // Read the initial counter value from the SD card
    Serial.print("Initial counter value: ");
    Serial.println(counter);
}

void loop() {
    // Check if the increment button is pressed
    if (isButtonPressed(0)) {
        Serial.println("\nIncrement button pressed.");
        counter++;
        writeCounterToSD(counter);  // Save updated counter to SD card
        Serial.print("Counter Incremented to ");
        Serial.println(counter);
    }

    // Check if the reset button is pressed
    if (isButtonPressed(1)) {
        Serial.println("\nReset button pressed.");
        counter = 0;
        writeCounterToSD(counter);  // Save reset counter to SD card
        Serial.println("Counter reset to 0.");
    }
}

// Reads the counter value from the SD card
uint8_t readCounterFromSD() {
    uint8_t storedCounter = 0;
    initSDCard();

    // Check if the file exists on the SD card
    if (SD.exists(FILE_NAME)) {
        File file = SD.open(FILE_NAME, FILE_READ);
        if (file) {
            storedCounter = file.parseInt();  // Parse the counter value from the file
            file.close();
            Serial.println("Counter read from SD card.");
        } else {
            Serial.println("Error: Failed to read file.");
        }
    } else {
        Serial.println("No counter file found. Starting with counter = 0.");
    }

    disableSPI();
    return storedCounter;
}

// Writes the counter value to the SD card
void writeCounterToSD(uint8_t count) {
    initSDCard();

    // Remove the existing file if it exists
    if (SD.exists(FILE_NAME)) {
        SD.remove(FILE_NAME);
        Serial.println("Old counter file deleted.");
    }

    // Create and write the new counter value to the file
    File file = SD.open(FILE_NAME, FILE_WRITE);
    if (file) {
        file.print(count);
        file.close();
        Serial.println("Counter updated on SD card.");
    } else {
        Serial.println("Error: Failed to write to SD card.");
    }

    disableSPI();
}

// Initializes the SD card
void initSDCard() {
    enableSPI();  // Enable SPI communication

    Serial.println("SD card initializing");

    while(!SD.begin(CS_PIN)){
      Serial.print(".");
      delay(1000);
    }

    Serial.println("SD card initialized.");
}

// Enables SPI communication
void enableSPI() {
    Serial.println("Waiting for free the SPI bus. ");
    while (!digitalRead(CS_PIN))  // Wait until the chip select pin is LOW
    {
      Serial.print(".");
      delay(1000);
    }
    SPI.begin();
    pinMode(CS_PIN, OUTPUT);
    pinMode(11, OUTPUT);  // MOSI pin
    pinMode(12, INPUT);   // MISO pin
    pinMode(13, OUTPUT);  // SCK pin
    digitalWrite(CS_PIN, HIGH);
    Serial.println("SPI Enabled.");
}

// Disables SPI communication by setting SPI pins to input mode and driving them low.
// This makes the pins high impedance, effectively disconnecting the SPI interface.
void disableSPI() {
    SPI.end();
    pinMode(11, INPUT);  // MOSI pin
    pinMode(12, INPUT);  // MISO pin
    pinMode(13, INPUT);  // SCK pin
    pinMode(CS_PIN, INPUT);
    digitalWrite(11, LOW);
    digitalWrite(12, LOW);
    digitalWrite(13, LOW);
    digitalWrite(CS_PIN, LOW);
    Serial.println("SPI Disabled.");
}

// Checks if a button is pressed with debouncing
bool isButtonPressed(uint8_t switchIndex) {
    uint8_t pin = switchPins[switchIndex];
    int reading = digitalRead(pin);

    // Check if the button state has changed
    if (reading != lastButtonState[switchIndex]) {
        lastDebounceTime[switchIndex] = millis();
    }
    lastButtonState[switchIndex] = reading;

    // Validate the button press after debounce delay
    if ((millis() - lastDebounceTime[switchIndex]) > DEBOUNCE_DELAY) {
        if (reading != buttonState[switchIndex]) {
            buttonState[switchIndex] = reading;
            if (buttonState[switchIndex] == LOW) {
                return true;
            }
        }
    }
    return false;
}
Code Explanation (Master 1)
Setup
- Serial Communication: Starts at 115200 baud rate for debugging/logging.
- Button Pins: Configured with INPUT_PULLUP to detect button presses.
- Counter Initialization: Reads the existing counter value from the SD card or starts at 0 if no file exists.
Loop
- Increment Button:
- Checks if pressed using
isButtonPressed(0). - Increments the counter and writes it to the SD card using
writeCounterToSD().
- Checks if pressed using
- Reset Button:
- Checks if pressed using
isButtonPressed(1). - Resets the counter to 0 and updates the SD card.
- Checks if pressed using
SPI Management
enableSPI():- Waits for the SPI bus to be free (CS_PIN HIGH).
- Configures SPI pins (MOSI, MISO, SCK) and starts SPI communication.
- Drives CS_PIN HIGH to indicate communication readiness.
disableSPI():- Stops SPI communication using
SPI.end(). - Configures SPI pins as INPUT and drives them LOW to make them high-impedance, effectively disconnecting the master.
- Stops SPI communication using
SD Card Operations
initSDCard():- Initializes the SD card and retries until successful, indicated by
SD.begin(CS_PIN).
- Initializes the SD card and retries until successful, indicated by
readCounterFromSD():- Checks for count.txt on the SD card.
- Reads the counter value from the file, or defaults to 0 if the file doesn't exist.
writeCounterToSD():- Removes the existing file (if any).
- Writes the updated counter value to the file count.txt.
Button Debouncing
isButtonPressed():- Reads the button state and detects changes.
- Verifies state stability using
DEBOUNCE_DELAY(50ms). - Returns true when a valid button press is detected.
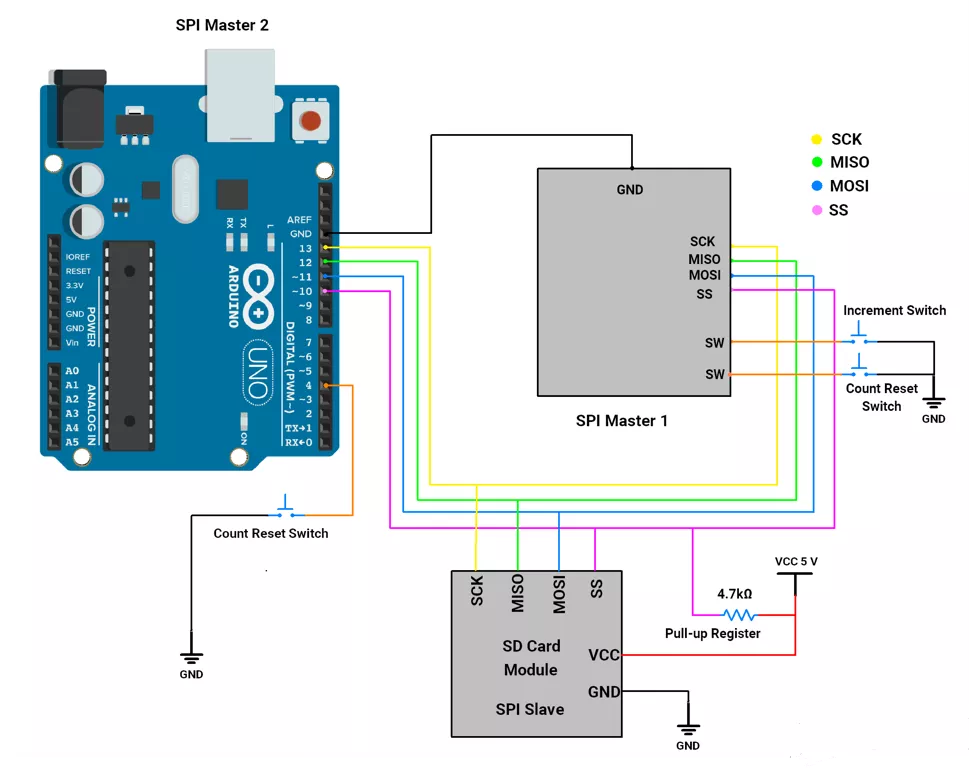
B) Arduino UNO as a Master 2
First, let's establish the hardware connection.
Circuit Connection
- Interfacing of a push button switch
- GPIO pin 4 → Count Read Switch
- Interface Master 2 SPI pins to the slave SD card and Master 1 SPI pins.
- GPIO PIN 13 → SCK
- GPIO PIN 11 → MISO
- GPIO PIN 12 → MOSI
- GPIO PIN 10 → CS/SS
- Connect Master 1 and Master 2 CS pin through a 4.7KΩ pull-up resistor.
Circuit Connection
Code (Master 2)
#include <SPI.h>
#include <SD.h>

#define CS_PIN 10
#define SWITCH_PIN 3
#define DEBOUNCE_DELAY 50

uint8_t counter = 0;
unsigned long lastDebounceTime = 0;
uint8_t lastButtonState = HIGH;
uint8_t buttonState = HIGH;

const char* FILE_NAME = "count.txt";  // File name used to store the counter on the SD card

void setup() {
    Serial.begin(115200);
    pinMode(SWITCH_PIN, INPUT_PULLUP);

    counter = readCounterFromSD();    // Read the counter value from the SD card at startup
    Serial.print("Counter value: ");
    Serial.println(counter);
}

void loop() {
    // Check if the button is pressed
    if (isButtonPressed()) {
        Serial.println("\nRead button pressed.");
        uint8_t count = readCounterFromSD();  // Fetch the counter value from the SD card
        Serial.print("Stored count is: ");
        Serial.println(count);
    }
}

// Reads the counter value from the SD card
uint8_t readCounterFromSD() {
    uint8_t storedCounter = 0;
    initSDCard();

    // Check if the file exists on the SD card
    if (SD.exists(FILE_NAME)) {
        File file = SD.open(FILE_NAME, FILE_READ);  // Open the file for reading
        if (file) {
            storedCounter = file.parseInt();  // Read the counter value as an integer
            file.close();
            Serial.println("Counter read from SD card.");
        } else {
            Serial.println("Error: Failed to read the file.");
        }
    } else {
        Serial.println("No counter file found. Starting with counter = 0.");
    }

    disableSPI();
    return storedCounter;
}

// Initializes the SD card and sets up the SPI interface
void initSDCard() {
    enableSPI();  // Enable SPI communication

    Serial.println("SD card initializing");

    while(!SD.begin(CS_PIN)){
      Serial.print(".");
      delay(1000);
    }

    Serial.println("SD card initialized.");
}

// Enables SPI communication
void enableSPI() {
    Serial.println("Waiting for free the SPI bus. ");
    while (!digitalRead(CS_PIN))  // Wait until the chip select pin is LOW
    {
      Serial.print(".");
      delay(1000);
    }
    SPI.begin();
    pinMode(CS_PIN, OUTPUT);
    pinMode(11, OUTPUT);  // MOSI pin
    pinMode(12, INPUT);   // MISO pin
    pinMode(13, OUTPUT);  // SCK pin
    digitalWrite(CS_PIN, HIGH);
    Serial.println("SPI Enabled.");
}

// Disables SPI communication by setting SPI pins to input mode and driving them low.
// This makes the pins high impedance, effectively disconnecting the SPI interface.
void disableSPI() {
    SPI.end();
    pinMode(11, INPUT);  // MOSI pin
    pinMode(12, INPUT);  // MISO pin
    pinMode(13, INPUT);  // SCK pin
    pinMode(CS_PIN, INPUT);

    digitalWrite(11, LOW);
    digitalWrite(12, LOW);
    digitalWrite(13, LOW);
    digitalWrite(CS_PIN, LOW);
    Serial.println("SPI Disabled.");
}

// Checks if the button is pressed with debounce logic
bool isButtonPressed() {
    int reading = digitalRead(SWITCH_PIN);  // Read the current button state

    // Detect button state change
    if (reading != lastButtonState) {
        lastDebounceTime = millis();  // Update debounce timer
    }
    lastButtonState = reading;

    // Validate button press after debounce delay
    if ((millis() - lastDebounceTime) > DEBOUNCE_DELAY) {
        if (reading != buttonState) {
            buttonState = reading;

            // Return true if the button is pressed
            if (buttonState == LOW) {
                return true;
            }
        }
    }

    return false;  // Return false if no valid press is detected
}
Code Explanation (Master 2)
Loop
- Button Check: If the button is pressed (
isButtonPressed()), it reads and prints the counter value from the SD card.
SPI Management
enableSPI():Waits for the SPI bus to be free, configures SPI pins, and starts SPI communication.disableSPI():- Stops SPI communication using
SPI.end(). - Configures SPI pins as INPUT and drives them LOW to make them high-impedance, effectively disconnecting the master.
- Stops SPI communication using
SD Card Operations
initSDCard():Initializes the SD card and retries until successful.readCounterFromSD(): Reads the counter value from count.txt or initializes it to 0 if the file doesn't exist.
Button Debouncing
isButtonPressed(): Debounces the button with a delay of 50ms and detects valid presses.
Output
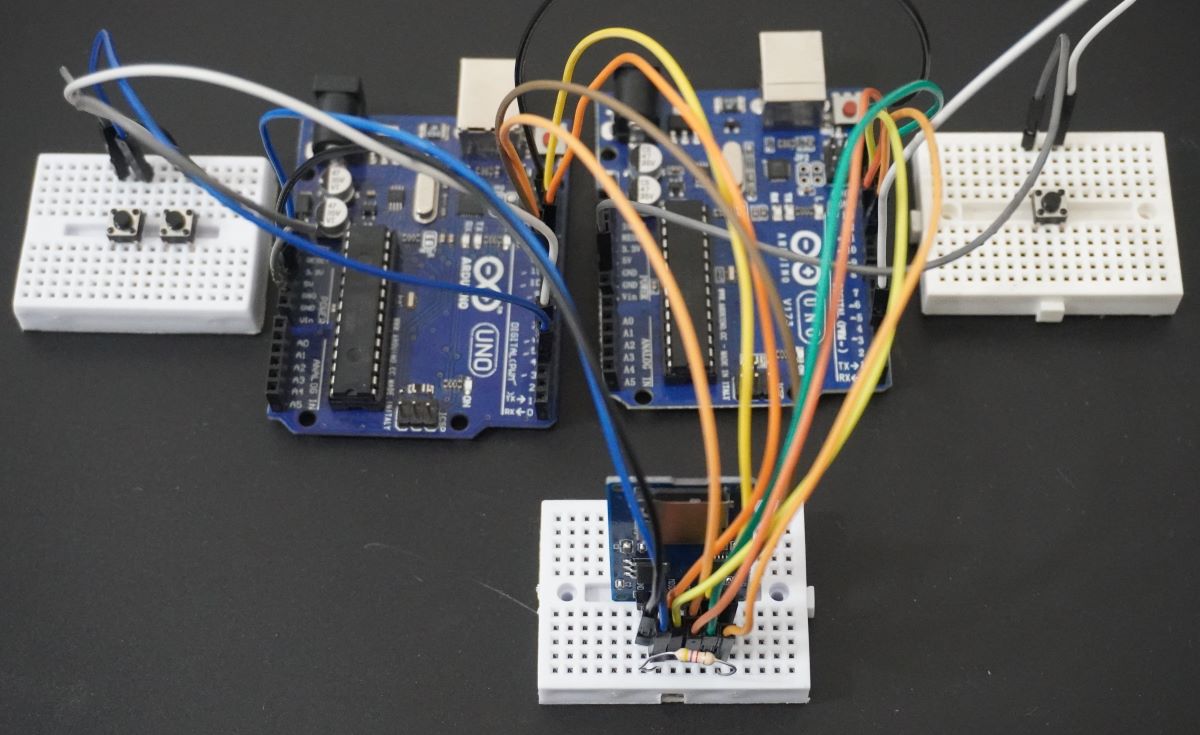
Hardware Setup
Master 1 Serial Monitor Output
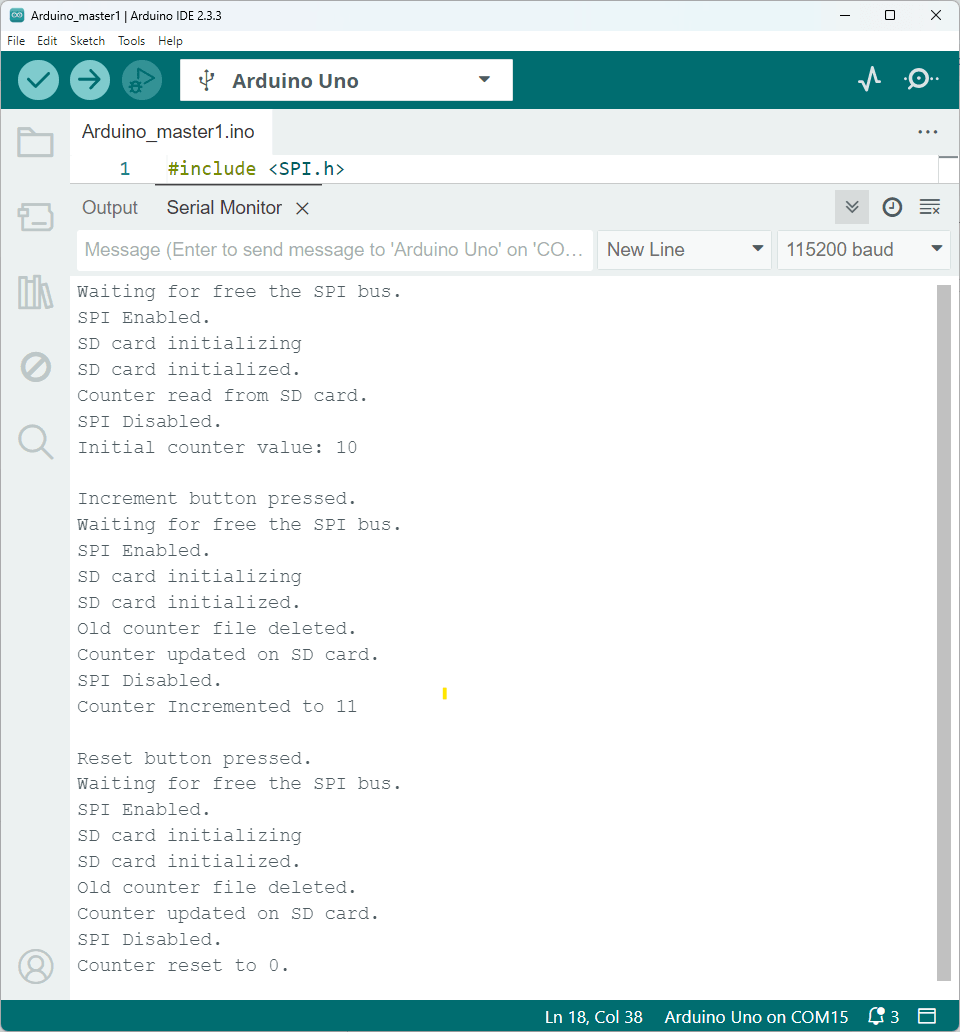
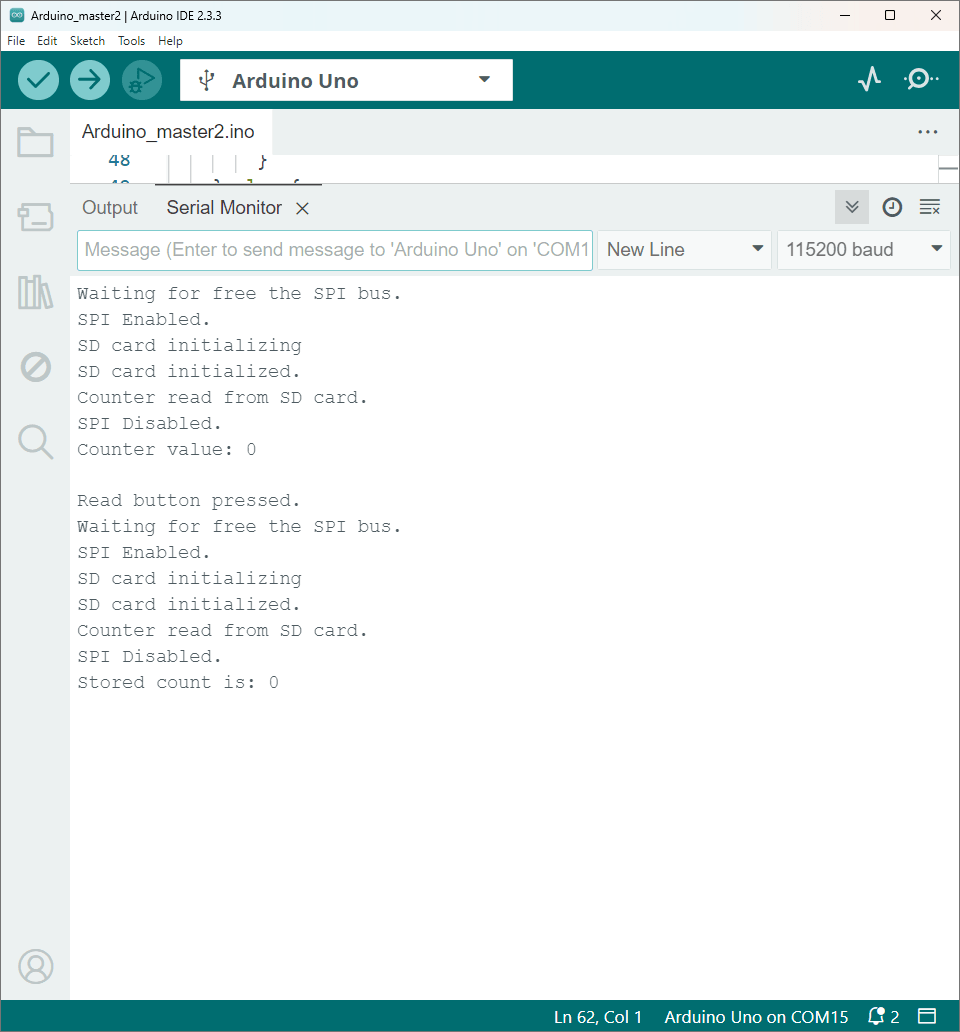
Master 2 Serial Monitor Output