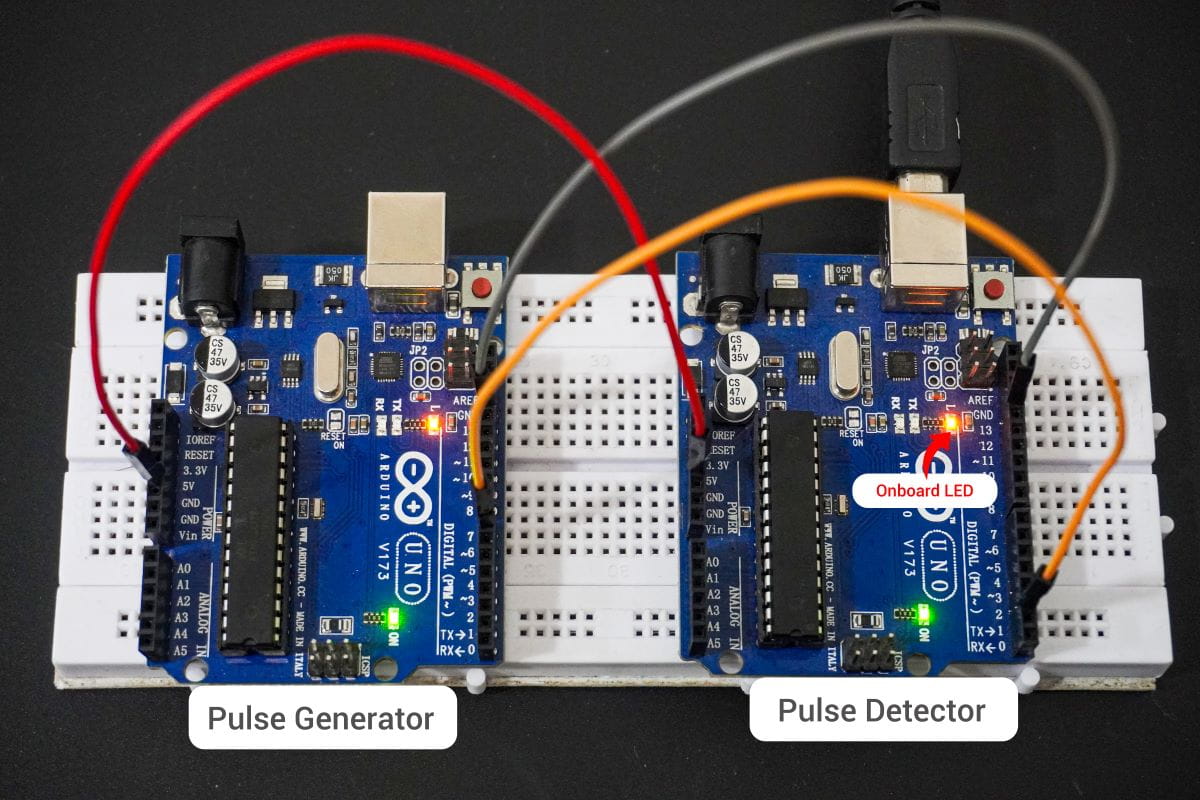
61. Short Pulse Detection
From the task, we understand that,
- We have to detect the pulse of width 100 or <100 nanoseconds.
- The code for Pulse generation is already given.
- The LED is toggled once the pulse is detected.
- Pulse detection can be done using two approaches
- Polling: Continuously checks the GPIO pin in the main loop to detect a pulse.
- Interrupt: Automatically detects a pulse when the pin state changes, without blocking the main task.
- But as per our task requirement, the polling method is not possible to implement, so we are going to use an interrupt to detect the pulse.
Hardware Interrupt Detection
- The GPIO hardware detects rising/falling edges automatically.
- Detection occurs within a single or a few CPU cycles, typically in the nanosecond range.
- Best suited for very short pulse detection (<100 ns) where polling is not feasible.
So we are going to use an interrupt to detect the high-frequency pulse < 100 nsec. Below are the solutions to the given task using different microcontrollers
- STM32
- ESP32
- Arduino UNO
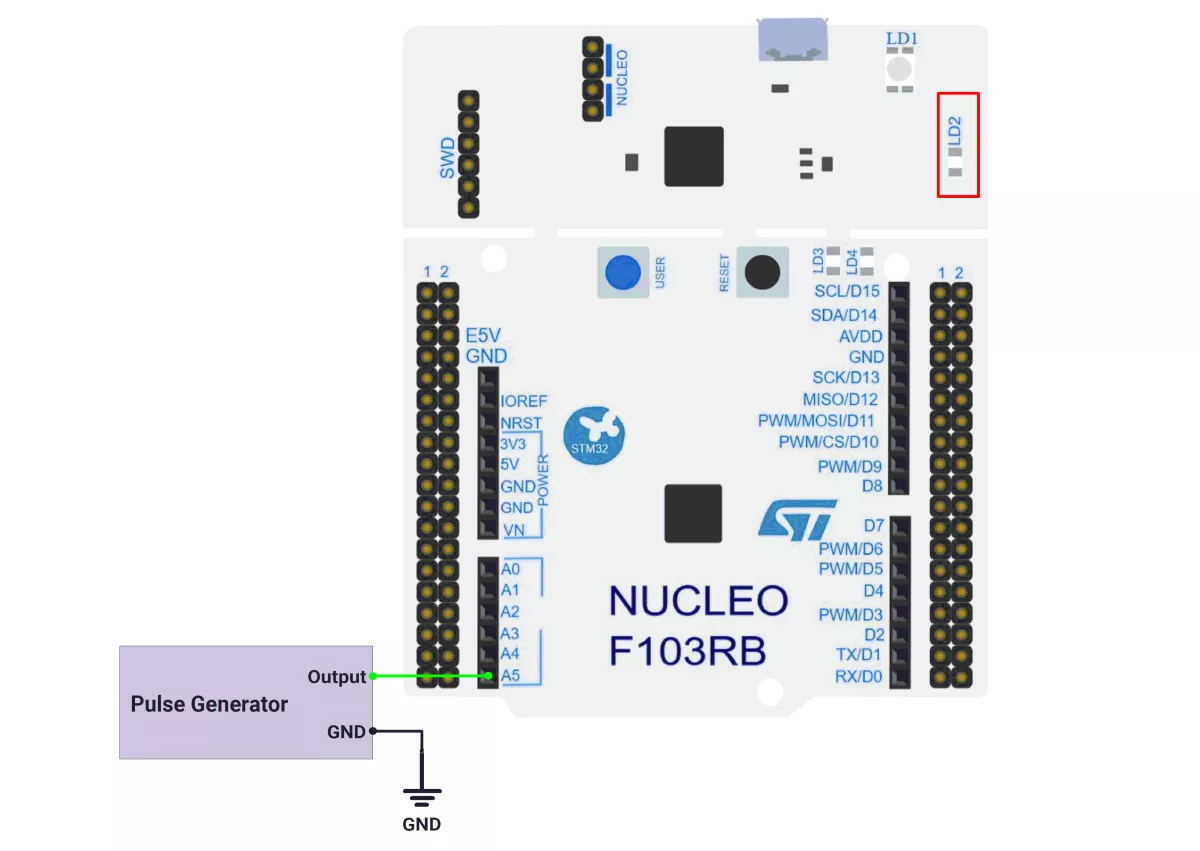
We’re using an STM32 NUCLEO-F103RB board, which runs at a 3.3 V logic level.
Key Peripherals Used:
- GPIO & EXTI: To connect a pulse generator on PC0 as an external interrupt and to drive the on-board LED LD2 (PA5).
- USART2 (optional): For debugging over the ST-Link VCP at 115200 baud.
Hardware Connection
- Pulse Generator: Connect the positive terminal of the pulse generator to PC0(A5) and the other to GND.
- LED: Use the NUCLEO’s on-board LED LD2 (PA5); it’s already wired through a resistor on the board.
Circuit Diagram
Firmware Implementation
Project Setup in STM32CubeIDE:
- Create a Project
- Open STM32CubeIDE and start a new project, select the NUCLEO-F103RB board.
- Basic Configuration (via CubeMX inside CubeIDE)
- Clock: Keep the default internal oscillator (no custom changes needed).
- GPIO Configuration:
- Set PC0 as
GPIO_EXTIon the RISING edge. - LED: Set PA5 (LD2) as GPIO Output Push-Pull.
- NVIC: Enable EXTI line 0 interrupt.
- Set PC0 as
- Code Generation
- CubeMX will automatically generate all the startup code, including:
HAL_Init()→ Initializes the HAL library.SystemClock_Config()→ Configures system clock.MX_GPIO_Init()→ Configures GPIO pins.
- This code sets up the hardware and prepares the project for firmware development, so we only need to add our application logic in the user code sections
- CubeMX will automatically generate all the startup code, including:
Firmware Design
Behavior Summary
- PC0: On a pulse detection (rising edge), EXTI0 fires.
- ISR action: In the EXTI callback, toggle LD2 (PA5). Each detected pulse toggles the LED state.
- Main loop: Empty; the demo is fully interrupt-driven (no polling or delays).
Code Snippets from main.c
GPIO Initialization
// In MX_GPIO_Init()

/* GPIO Ports Clock Enable */
__HAL_RCC_GPIOC_CLK_ENABLE();
__HAL_RCC_GPIOD_CLK_ENABLE();
__HAL_RCC_GPIOA_CLK_ENABLE();
__HAL_RCC_GPIOB_CLK_ENABLE();

/*Configure GPIO pin Output Level */
HAL_GPIO_WritePin(LD2_GPIO_Port, LD2_Pin, GPIO_PIN_RESET);

/*Configure GPIO pin : PC0 */
GPIO_InitTypeDef GPIO_InitStruct = {0};
GPIO_InitStruct.Pin = GPIO_PIN_0;
GPIO_InitStruct.Mode = GPIO_MODE_IT_RISING;
GPIO_InitStruct.Pull = GPIO_NOPULL;
HAL_GPIO_Init(GPIOC, &GPIO_InitStruct);

/*Configure GPIO pin : LD2_Pin (PA5) */
GPIO_InitStruct.Pin = LD2_Pin;
GPIO_InitStruct.Mode = GPIO_MODE_OUTPUT_PP;
GPIO_InitStruct.Pull = GPIO_NOPULL;
GPIO_InitStruct.Speed = GPIO_SPEED_FREQ_LOW;
HAL_GPIO_Init(LD2_GPIO_Port, &GPIO_InitStruct);

/* EXTI interrupt init*/
HAL_NVIC_SetPriority(EXTI0_IRQn, 0, 0);
HAL_NVIC_EnableIRQ(EXTI0_IRQn);
This configuration initializes PC0 as an external interrupt input, and LD2 (PA5) is configured as a push-pull digital output.
Macros for Ports and Pins
These are generated by Cube and available via main.h for the NUCLEO board:
// From CubeMX-generated headers
// LD2 GPIO on PA5
#define LD2_Pin        GPIO_PIN_5
#define LD2_GPIO_Port  GPIOA
Using these symbolic names makes the code portable and clear.
External Interrupt Callback
// Triggered when PC0 detects a rising edge (button press)
void HAL_GPIO_EXTI_Callback(uint16_t GPIO_Pin)
{
  if (GPIO_Pin == GPIO_PIN_0)
  {
    HAL_GPIO_TogglePin(LD2_GPIO_Port, LD2_Pin);
  }
}
When the pulse is detected, LD2 toggles immediately inside the EXTI ISR.
Main Firmware Logic
int main(void)
{
  HAL_Init();                 // HAL + SysTick
  SystemClock_Config();       // HSI + PLL
  MX_GPIO_Init();             // PC0 (EXTI), PA5 (LD2)
  MX_USART2_UART_Init();      // Optional debugging UART @115200

  while (1)
  {
    // Interrupt-driven demo: nothing to do here
  }
}
Step-by-step:
- System and peripherals are initialized.
- EXTI0 is armed on PC0 (rising edge).
- Each rising edge triggers EXTI, and the LED toggles in the callback.
- The while(1) loop remains idle—no blocking delays, no polling.
Download Project
The complete STM32CubeIDE project (including .ioc configuration, main.c, and HAL drivers) is available here:
📥 Download Project
We are using the ESP32 DevKitC v4 development board and programming it using the Arduino IDE.
- Before uploading, make sure to select “ESP32 Dev Module” as the board to ensure correct settings and compatibility.
Detecting the Pulse Using Polling in ESP32
digitalRead() takes about 2–3 µs, while the pulse is <100 ns, is too short to detect by polling.
Detecting the Pulse Using an Interrupt in ESP32
Time consumed by the interrupt:
- GPIO edge detection: ≈12.5 ns (1 APB clock cycle at 80 MHz)
- CPU interrupt response and execution: ≈40–80 ns (10–20 CPU cycles at 240 MHz)
A rising or falling edge GPIO interrupt should be used for reliable detection of <100 ns pulse.
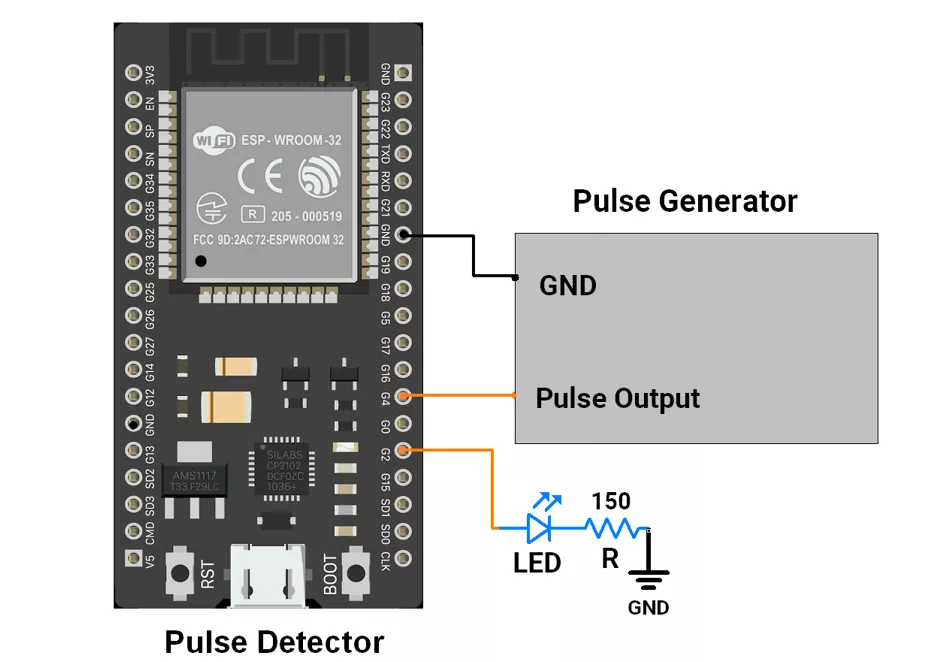
Hardware Connection
- Connect the pulse generator output to the Pulse detector GPIO pin 4.
- LED → GPIO pin 2 with 150 ohm current limiting resistor.
- Make GND common.
Circuit Connection
Note: Avoid using GPIOs 34–39 for push-buttons while using ESP32 because they do not support pull-up/down resistors internally.
Firmware implementation
Code
#define PULSE_PIN 4  // Input pin for incoming pulse (GPIO 4)
#define LED_PIN 2    // Output pin driving the LED (GPIO 2)

volatile bool state = false;

// Interrupt Service Routine (runs on each RISING edge on PULSE_PIN)
void IRAM_ATTR handlePulse() {
  state = !state;
  digitalWrite(LED_PIN, state);  // Toggle LED
}

void setup() {

  // Configure pins
  pinMode(PULSE_PIN, INPUT);  // Configure as Input
  pinMode(LED_PIN, OUTPUT);   // LED pin as output

  // Attach interrupt on GPIO4, trigger on RISING edge
  attachInterrupt(digitalPinToInterrupt(PULSE_PIN), handlePulse, RISING);
}

void loop() {
  //controller doing important task here
}
Code Explanation
This code uses a GPIO interrupt on pin 4 of the ESP32 to detect a rising edge signal and toggle an LED on pin 2.
Pin Setup:
pinMode(4, INPUT);→ Configures GPIO 4 as an input.pinMode(2, OUTPUT);→ Configures GPIO 2 as an output to drive the LED.
Interrupt Attachment:
attachInterrupt(digitalPinToInterrupt(4), handlePulse, RISING);
Sets up an interrupt on GPIO 4, triggering on the rising edge of the input pulse.
ISR Functionality:
- The ISR
handlePulse()executes immediately when a rising edge is detected. - Inside the ISR:
state = !state;→ toggles the LED state.
digitalWrite(2, state);→ updates the LED output accordingly.
Main Loop:
- The
loop()is empty because the program is interrupt-driven, responding instantly to external rising-edge pulses without polling
We are using the Arduino UNO development board and programming it using the Arduino IDE.
- Before uploading, make sure to select “Arduino UNO” as the board to ensure correct settings and compatibility.
Detecting the pulse using an interrupt in Arduino UNO
- Time consumed by the Interrupt
- State change interrupt: 250-312 ns (4-5 cycles)
- Edge interrupt: 62.5 ns (1 cycle)
- Rising or falling edge interrupt (INT0, pin 2) must be used for detection
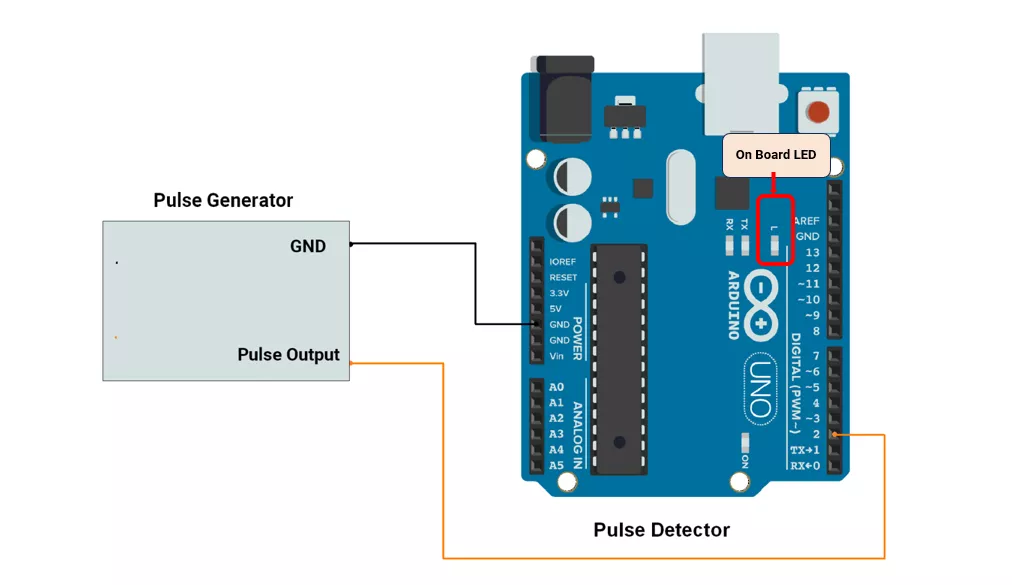
Hardware Connection
- Connect the pulse generator output to the Pulse detector pin 2.
- We will use an onboard LED connected to pin no. 13 of Arduino UNO.
- Make GND common.
Circuit Connection
Firmware
The firmware
- Set external interrupt on pin 2 for the rising edge.
- Toggle the onboard LED on pin 13 when the interrupt occurs.
Code
// Interrupt Service Routine for INT0 (pin 2)
void ISR_INT0() {
  digitalWrite(13,!digitalRead(13));      //toggles the LED when pulse detected
}

void setup() {
  pinMode(2, INPUT);    // Configure interrupt INT0 (pin 2) as input
  pinMode(13, OUTPUT);  //onboard LED is connected to pin 13

  // Attach external interrupts
  attachInterrupt(digitalPinToInterrupt(2), ISR_INT0, RISING); // Trigger on rising edge for INT0
}

void loop() {

}
Code Explanation
This code uses an external interrupt (INT0) on pin 2 of an Arduino to detect a rising edge signal and toggle an LED on pin 13.
Pin Setup
pinMode(2, INPUT): Configures pin 2 as an input.pinMode(13, OUTPUT): Configures pin 13 as an output to control the onboard LED.
Interrupt Attachment:
attachInterrupt(digitalPinToInterrupt(2), ISR_INT0, RISING): Sets up an interrupt on pin 2 to trigger on a rising edge.
ISR Functionality:
- When a rising edge is detected,
ISR_INT0()is executed:- Toggles the LED on pin 13 using
digitalWrite(13, !digitalRead(13)).
- Toggles the LED on pin 13 using
Main Loop
- The
loop()function is empty since the program is interrupt-driven and responds instantly to external events.
Output
Hardware Setup