
55. LED Toggling Using I2C
In this task, we are implementing that when a push-button connected to the Master microcontroller is pressed, the Slave microcontroller toggles an LED connected to it using I2C communication.
For this, we have to establish I2C communication between the master and the slave.
Understanding I²C Protocol
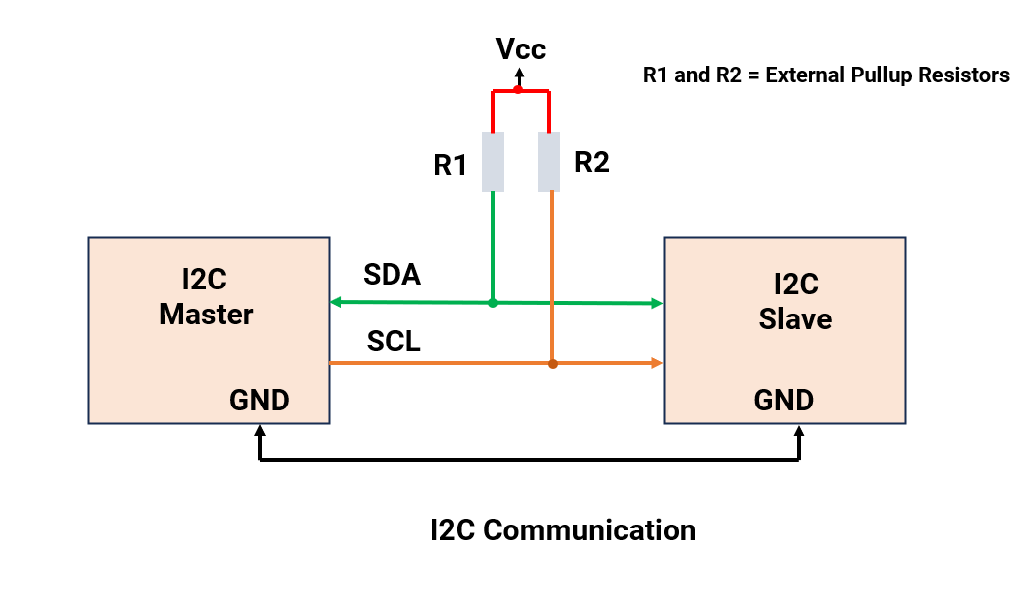
I²C (Inter-Integrated Circuit) is a serial communication protocol that uses only two lines
- SDA (Serial Data) – Transfers data between devices.
- SCL (Serial Clock) – Provides clock signal (controlled by the Master).
Key characteristics:
- Master-Slave Architecture: The Master initiates and controls communication; Slaves respond.
- Open-Drain Configuration: Devices can only pull the line LOW, so pull-up resistors are mandatory on both SDA and SCL.
- Addressing:
- Each Slave has a unique 7-bit address (0x08 to 0x77 for general usage).
- In this task, we will use a 0x08 slave address.
- Speed: Standard mode is 100 kHz, which is suitable for this task as LED toggling is not time-critical.
Important Design Considerations
- Pull-Up Resistors:
- Required because of the open-drain nature of I²C lines.
- Typical value: 4.7 kΩ for 100 kHz communication (can range from 4.7 kΩ to 10 kΩ depending on bus capacitance and speed).
- Pull-Up Voltage:
- Use 5V if both microcontrollers operate at 5V.
- Use 3.3V if one or both microcontrollers operate at 3.3V.
- Common Ground: Both boards must share a common GND for proper communication.
- Debouncing: Push buttons exhibit noise; implement software debounce logic to avoid multiple triggers.
Hardware Setup
- Master Connection:
- Connect the push button to any Digital GPIO pin (configured with internal or external pull-up).
- Slave Connection
- Connect the LED to any Digital GPIO pin through a current-limiting resistor.
- I²C Connections:
- Master SDA → Slave SDA
- Master SCL → Slave SCL
- 4.7 kΩ external pull-up resistors between VCC and SDA/SCL.
- Common GND between Master and Slave.
Note: When interfacing I²C devices operating at different voltages (e.g., 5 V ↔ 3.3 V), always use a voltage level shifter to ensure safe logic levels and reliable communication.
So, by connecting and configuring the master and slave devices and the I2C communication, we can implement the task.
Below are the solutions to the given task using different microcontrollers
- STM32
- ESP32
- Arduino UNO
LED Toggling Using I2C Implementation on STM32
We’re using an STM32 NUCLEO-F103RB board for both as master and slave, which operates at a 3.3V logic level.
A) STM32 as a master
Key Peripherals Used
- I2C1: For I2C communication between the master and the slave.
- GPIO: For connecting the push-button switch
- USART2: For serial communication with a serial terminal to display debug messages.
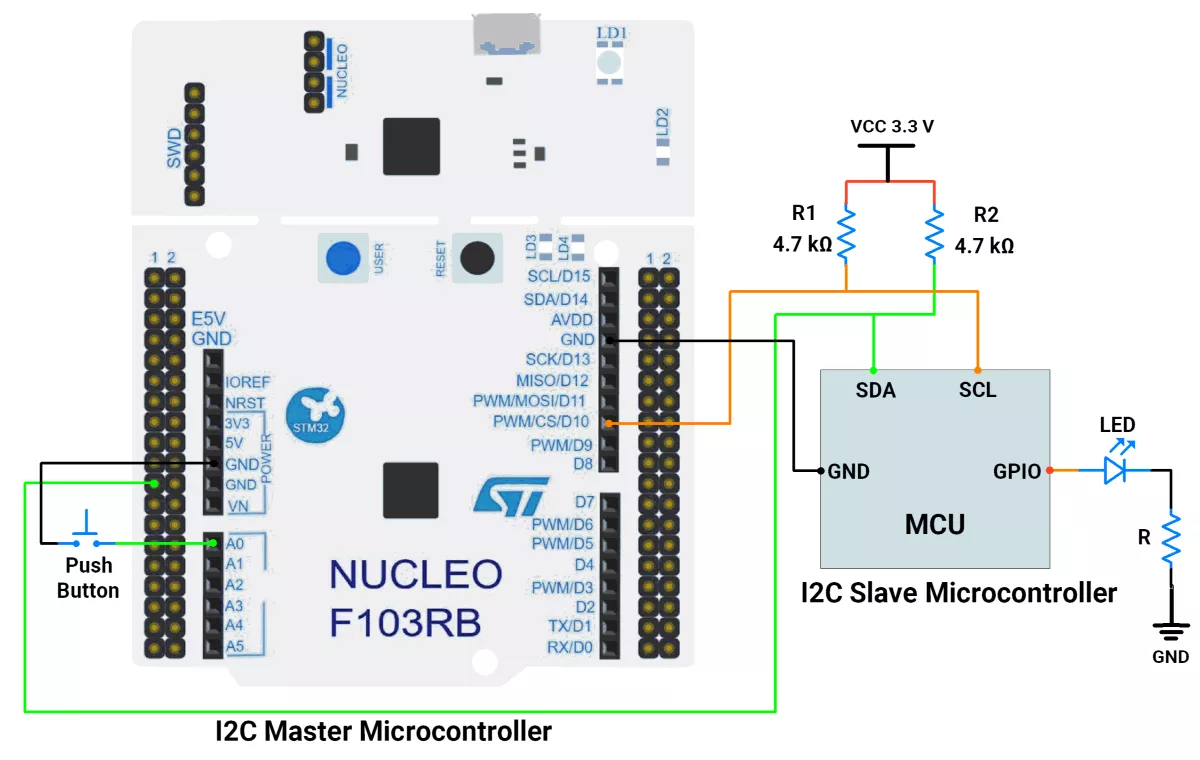
Hardware Connection
- Connect the Push-button to PA0 (A0) and configure it as an input with an internal pull-up..
- Connect PB6 → SCL pin of the Slave microcontroller.
- Connect PB7 → SDA pin of the Slave microcontroller.
- Ensure a shared GND between the Master and Slave boards.
- Place 4.7 kΩ pull-up resistors between VCC and each of the SDA and SCL lines.
- Connect the USB cable to the PC for power and UART communication.
Circuit Diagram
Firmware Implementation
Project Setup in STM32CubeIDE
- Create a Project
- Open STM32CubeIDE, start a new project, and select the NUCLEO-F103RB board.
- Basic Configuration (via CubeMX inside CubeIDE)
- Clock: Use the default HSI oscillator with PLL enabled (as configured in
SystemClock_Config). - GPIO:
- Enable clocks for PORTA, PORTB, PORTC, and PORTD.
- Configure PA0 as input with internal pull-up enabled.
- I2C1: I2C mode (Standard mode, 100kHz clock).
- USART2: Enabled at 115200 baud, 8-N-1, for debugging/expansion if needed.
- Clock: Use the default HSI oscillator with PLL enabled (as configured in
- Code Generation
- CubeMX will automatically generate all the startup code, including:
HAL_Init()→ Initializes HAL and system tick.SystemClock_Config()→ Configures system clock (HSI + PLL).MX_GPIO_Init()→ Initializes GPIO ports.MX_USART2_UART_Init()→ Configures UART2.MX_I2C1_Init()→ Configures I2C1.
- This code sets up the hardware and prepares the project for firmware development, so we only need to add our application logic in the user code sections
- CubeMX will automatically generate all the startup code, including:
Code Snippets from main.c
I2C Initialization (MX_I2C1_Init)
hi2c1.Instance = I2C1;
hi2c1.Init.ClockSpeed = 100000;       // 100kHz
hi2c1.Init.DutyCycle = I2C_DUTYCYCLE_2;
hi2c1.Init.AddressingMode = I2C_ADDRESSINGMODE_7BIT;
if (HAL_I2C_Init(&hi2c1) != HAL_OK) {
  Error_Handler();
}
Initializes I2C1 peripheral with 100kHz clock speed, standard duty cycle, and 7-bit addressing mode.
GPIO Initialization(MX_GPIO_Init)
 /*Configure GPIO pin : PA0 */
 GPIO_InitStruct.Pin = GPIO_PIN_0;
 GPIO_InitStruct.Mode = GPIO_MODE_INPUT;
 GPIO_InitStruct.Pull = GPIO_PULLUP;
 HAL_GPIO_Init(GPIOA, &GPIO_InitStruct);
This code initializes GPIO pin PA0 as an input with a pull-up resistor enabled.
Private defines and Variables
#define SWITCH_PORT GPIOA
#define SWITCH_PIN GPIO_PIN_0
#define SLAVE_ADDRESS 0x08  // slave address

uint8_t ledState = 0;     // LED state
// Switch variables
uint8_t g_debounceDuration = 50; // Minimum time to debounce button (in milliseconds)
uint8_t g_previousButtonState = 1;       // Previous state of the button
uint8_t g_currentButtonState = 1;        // Current state of the button
uint32_t g_lastDebounceTime = 0;   // Time when button state last changed
Defines button pin (PA0) and slave address (0x08). Tracks LED state and debounce timing variables (50ms threshold).
Private Function
//Checks for a debounced button press and returns true if detected, false otherwise.
uint8_t debouncedButtonPressCheck(GPIO_TypeDef *GPIOx, uint16_t GPIO_Pin,
		uint8_t expectedState) {
	uint8_t buttonReading = HAL_GPIO_ReadPin(GPIOx, GPIO_Pin);
	// If the button state has changed, reset the debounce timer
	if (buttonReading != g_previousButtonState) {
		g_lastDebounceTime = HAL_GetTick();
	}
	g_previousButtonState = buttonReading;
	// If the state has remained stable beyond the debounce duration, consider it valid
	if ((HAL_GetTick() - g_lastDebounceTime) > g_debounceDuration) {
		if (buttonReading != g_currentButtonState) {
			g_currentButtonState = buttonReading;
			if (g_currentButtonState == expectedState) {
				return 1; // Return true if the desired state is detected
			}
		}
	}
	return 0; // Return false if no valid press is detected
}
Reads button state, ignores noise for 50ms, and returns true if pressed. Ensures reliable button detection.
Main Loop Logic
 while (1)
 {
	    // check if switch is pressed or not
	    if (debouncedButtonPressCheck(SWITCH_PORT, SWITCH_PIN, 0))
	    {
	      ledState = !ledState;
	      HAL_I2C_Master_Transmit(&hi2c1, SLAVE_ADDRESS << 1, &ledState, 1, HAL_MAX_DELAY);
	    }
 }
Checks for button presses. If pressed, toggles ledState and sends it via I2C to the slave. Runs indefinitely.
Key HAL Functions Used
HAL_I2C_Init, HAL_GPIO_ReadPin, and HAL_I2C_Master_Transmit handle I2C and GPIO. HAL_GetTick manages debounce timing.
Expected Output
When the button is pressed, the master toggles ledState and sends it to the slave. The slave should respond by toggling its LED.
Download Project
The complete STM32CubeIDE project (including .ioc configuration, main.c, and HAL files) is available here:
📥 Download Project
Output
B) STM32 as a slave
Key Peripherals Used
- I2C1: For I2C communication between the master and the slave.
- GPIO: For connecting the LED.
- USART2: For serial communication with a serial terminal to display debug messages.
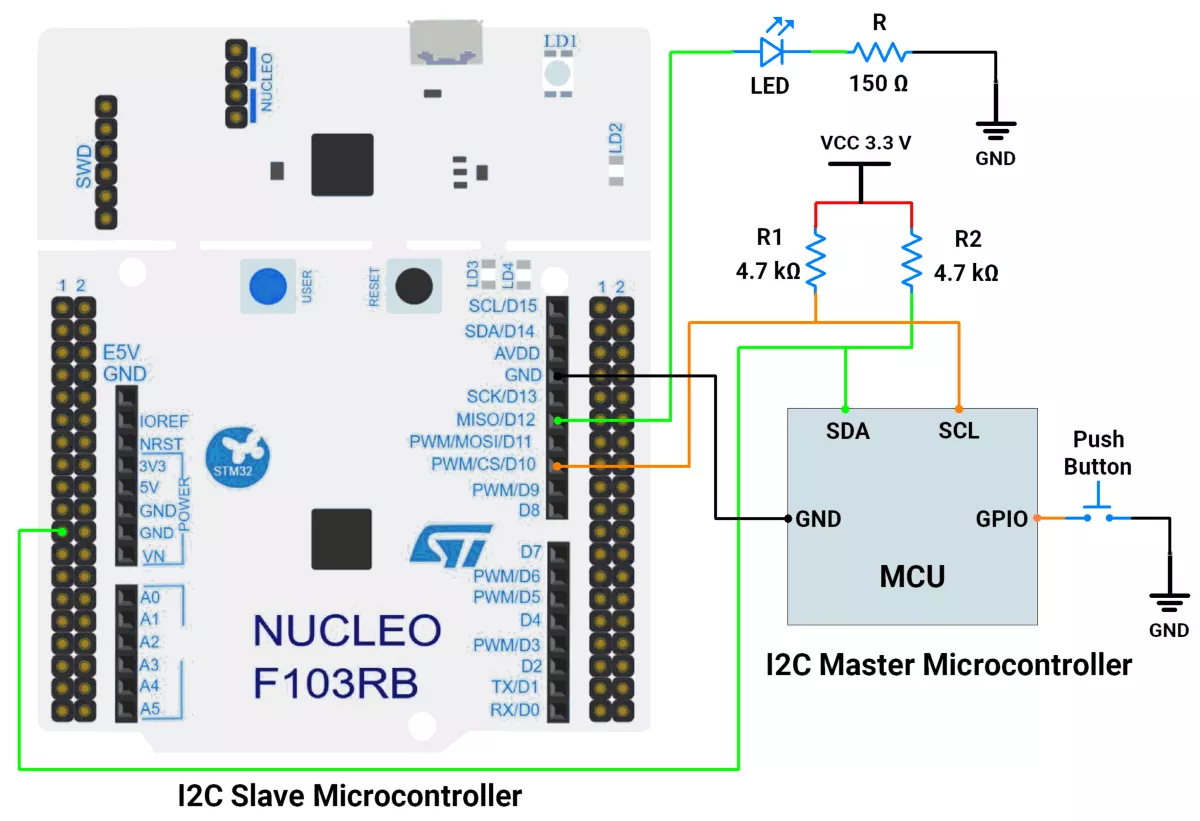
Hardware Connection
- Connect the LED to PA6 (D12) and configure it as an output with push-pull.
- Connect PB6 ➔ SCL of the master microcontroller.
- Connect PB7 ➔ SDA of the master microcontroller.
- Connect 4.7 kΩ resistors between VCC and each of SDA & SCL.
- Shared GND between master and slave.
- Connect the USB to the PC (power + UART).
Circuit Diagram
Firmware Implementation
Project Setup in STM32CubeIDE
- Create a Project
- Open STM32CubeIDE, start a new project, and select the NUCLEO-F103RB board.
- Basic Configuration (via CubeMX inside CubeIDE)
- Clock: Use the default HSI oscillator with PLL enabled (as configured in
SystemClock_Config). - GPIO:
- Enable clocks for PORTA, PORTB, PORTC, and PORTD.
- PA6 as output (LED).
- I2C1 Configuration:
- Mode: I2C Slave (7-bit address 0x08).
- Clock Speed: 100kHz (must match master).
- Primary slave address: 0x08
- Interrupt: Enable I2C Event Interrupt in NVIC for non-blocking reception.
- USART2: Enabled at 115200 baud, 8-N-1, for debugging/expansion if needed.
- Clock: Use the default HSI oscillator with PLL enabled (as configured in
- Code Generation
- CubeMX will automatically generate all the startup code, including:
HAL_Init()→ Initializes HAL and system tick.SystemClock_Config()→ Configures system clock (HSI + PLL).MX_GPIO_Init()→ Initializes GPIO ports.MX_USART2_UART_Init()→ Configures UART2.MX_I2C1_Init()→ Configures I2C1.
- This code sets up the hardware and prepares the project for firmware development, so we only need to add our application logic in the user code sections
- CubeMX will automatically generate all the startup code, including:
Code Snippets from main.c
I2C Initialization (Slave Mode)
 hi2c1.Instance = I2C1;
 hi2c1.Init.ClockSpeed = 100000;
 hi2c1.Init.DutyCycle = I2C_DUTYCYCLE_2;
 hi2c1.Init.OwnAddress1 = 16;	//SLAVE_ADDRESS<<1 i.e. 0x08<<1
 hi2c1.Init.AddressingMode = I2C_ADDRESSINGMODE_7BIT;
 hi2c1.Init.DualAddressMode = I2C_DUALADDRESS_DISABLE;
 hi2c1.Init.OwnAddress2 = 0;
 hi2c1.Init.GeneralCallMode = I2C_GENERALCALL_DISABLE;
 hi2c1.Init.NoStretchMode = I2C_NOSTRETCH_DISABLE;
 if (HAL_I2C_Init(&hi2c1) != HAL_OK)
 {
   Error_Handler();
 }
It initializes the I2C1 peripheral with specified parameters (100 kHz clock, 7-bit addressing, own address 0x08<<1, no dual address, no general call, and no clock stretching), and calls Error_Handler() if initialization fails.
GPIO Initialization(MX_GPIO_Init)
 /*Configure GPIO pin : PA6 */
 GPIO_InitStruct.Pin = GPIO_PIN_6;
 GPIO_InitStruct.Mode = GPIO_MODE_OUTPUT_PP;
 GPIO_InitStruct.Pull = GPIO_NOPULL;
 GPIO_InitStruct.Speed = GPIO_SPEED_FREQ_LOW;
 HAL_GPIO_Init(GPIOA, &GPIO_InitStruct);
This code initializes GPIO pin PA6 as a low-speed push-pull output with no pull-up/pull-down resistors.
The slave uses interrupt-driven I2C communication to listen for master commands:
Key Callbacks
HAL_I2C_AddrCallback: Triggered when the slave address is matched.HAL_I2C_SlaveRxCpltCallback: Executed when data reception completes.HAL_I2C_ListenCpltCallback: Re-enables listening after each transaction.
1. Address Match Callback
void HAL_I2C_AddrCallback(I2C_HandleTypeDef *hi2c, uint8_t TransferDirection, uint16_t AddrMatchCode) {
  if (hi2c->Instance == I2C1 && TransferDirection == I2C_DIRECTION_TRANSMIT) {
    HAL_I2C_Slave_Sequential_Receive_IT(hi2c, &receivedData, 1, I2C_LAST_FRAME);
  }
}
Triggered when the master addresses this slave. If the direction is transmit (master writing), it prepares to receive 1 byte of data.
2. Receive Complete Callback
void HAL_I2C_SlaveRxCpltCallback(I2C_HandleTypeDef *hi2c) {
  if (hi2c->Instance == I2C1) {
    // Toggle LED based on received data (1=ON, 0=OFF)
    HAL_GPIO_WritePin(LED_PORT, LED_PIN, (receivedData == 1) ? GPIO_PIN_SET : GPIO_PIN_RESET);
  }
}
Executed after data reception finishes. Updates the LED state (ON/OFF) based on the received value (1 or 0).
3. Listen Complete Callback
void HAL_I2C_ListenCpltCallback(I2C_HandleTypeDef *hi2c) {
  if (hi2c->Instance == I2C1) {
    HAL_I2C_EnableListen_IT(hi2c); // Re-enable listening
  }
}
Re-enables listening after each transaction to ensure continuous operation. Acts as a reset for the next I2C communication.
Main Loop
The slave runs in an infinite loop, relying entirely on I2C interrupts:
// Enable interrupt-based listening
HAL_I2C_EnableListen_IT(&hi2c1);

while (1) {
  // All logic is handled in callbacks
}- Enables interrupt-driven listening for I2C communication. The slave waits for its address (0x08) to be called by the master.
- The slave idles indefinitely, relying on I2C interrupts to handle communication. No active polling is needed.
Expected Behavior
- Master Sends 1: Slave LED turns ON.
- Master Sends 0: Slave LED turns OFF.
- Debouncing: Handled on the master side; slave reacts only to valid transmissions.
Key HAL Functions Used
HAL_I2C_EnableListen_IT()- Enables slave to listen for its address (interrupt-based).
HAL_I2C_Slave_Sequential_Receive_IT()- Prepares slave to receive data after address match.
HAL_GPIO_WritePin()- Controls the LED (ON/OFF) based on received data.
- Callbacks Used:
HAL_I2C_AddrCallback→ Triggered on address match.HAL_I2C_SlaveRxCpltCallback→ Called after data reception.HAL_I2C_ListenCpltCallback→ Re-enables listening after transaction.
Download Project
The complete STM32CubeIDE project (including .ioc configuration and callbacks) is available here:
📥 Download Project
We are using the ESP32 DevKit v4 development board and programming it using the Arduino IDE.
- Before uploading, make sure to select “ESP32 Dev Module” as the board to ensure correct settings and compatibility.
In both ESP32 master and slave codes, the Wire.h library is used for I²C communication.
Default I²C Pins Of ESP32
By default, the ESP32 Arduino core assigns:
- SDA → GPIO21
- SCL → GPIO22
In the given task, we used the default I²C Pins.
Solution of the given task:
- ESP32 as Master
- ESP32 as Slave
A) ESP32 as Master
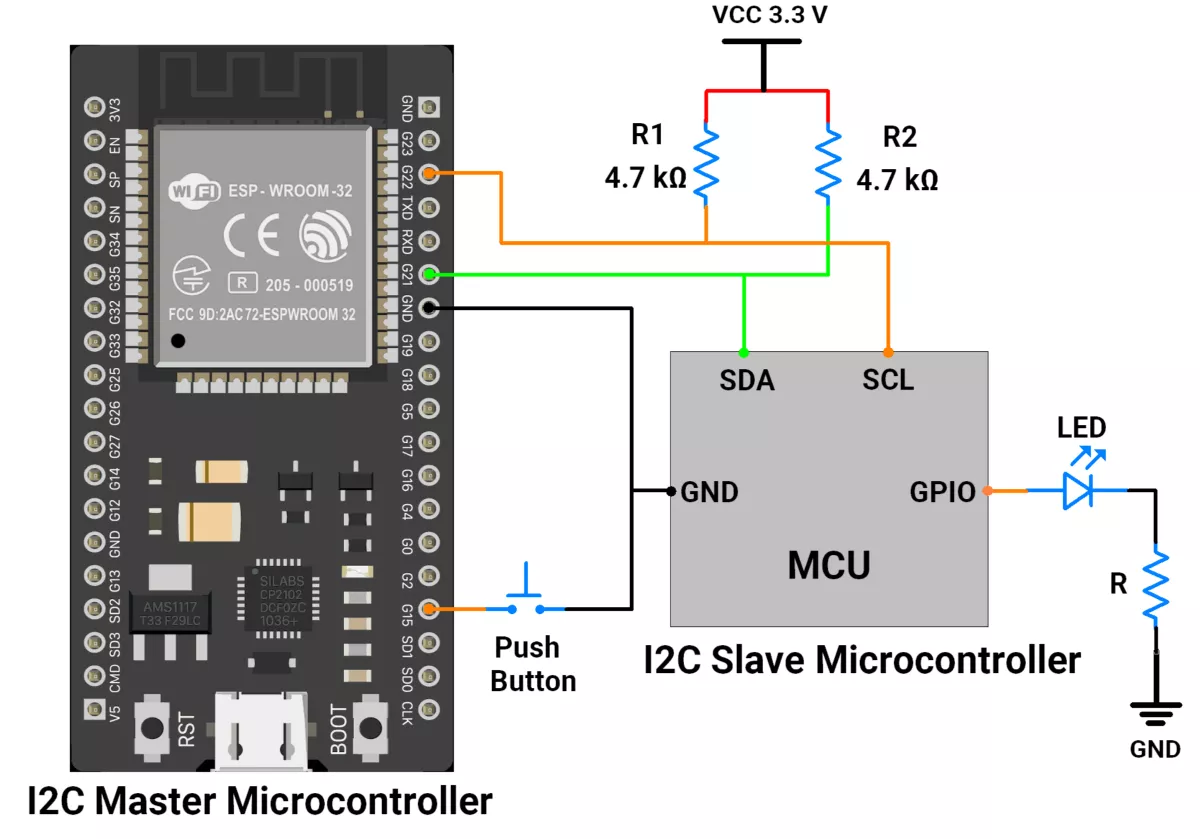
Circuit Connection
- Interface push button switch to GPIO pin 15.
- Place 4.7 kΩ pull-up resistors between VCC and each of the SDA and SCL lines.
- Interface the LED to the slave device with a current-limiting resistor.
Firmware Implementation
The I²C slave can be any microcontroller (e.g., Arduino UNO, ESP32, STM32) programmed with the same slave address (0x08). Only the slave code changes.
Master Code
#include "Wire.h"
#define switchPin 15        // Push-button connected to GPIO 15
#define I2C_DEV_ADDR 0x08   // I2C Slave address
uint8_t ledState = 0;       // Variable to hold LED state (0=OFF, 1=ON)
uint8_t error;              // Error code for I2C transmission

unsigned long debounce_delay = 50;     // Debounce time (ms)
int last_switch_state = 1;             // Last button state (1=not pressed, 0=pressed)
int current_switch_state = 1;          // Stable button state after debounce
unsigned long last_debounce_time = 0;  // Last time button state changed

// Function to disable ESP32's internal pull-up/pull-down on I2C pins
void ensureNoInternalPullups(int sda = 21, int scl = 22) {
  gpio_pullup_dis((gpio_num_t)sda);    // Disable pull-up on SDA
  gpio_pulldown_dis((gpio_num_t)sda);  // Disable pull-down on SDA
  gpio_pullup_dis((gpio_num_t)scl);    // Disable pull-up on SCL
  gpio_pulldown_dis((gpio_num_t)scl);  // Disable pull-down on SCL
}

void setup() {
  Serial.begin(115200);              // Start serial monitor
  pinMode(switchPin, INPUT_PULLUP);  // Configure button with internal pull-up
  Wire.begin();                      // Initialize I2C as Master
  ensureNoInternalPullups();         // Ensure no extra pull-ups/pull-downs
}

void loop() {

  // Check if button is pressed with debounce handling
  if (is_debounced_press(switchPin)) {
    ledState = !ledState;  // Toggle LED state variable

    // Send LED state to slave via I2C
    Wire.beginTransmission(I2C_DEV_ADDR);
    Wire.write(ledState);  // Send 1 byte (LED state)
    uint8_t error = Wire.endTransmission(true);

    // Check transmission status
    if (error == 0) {
      Serial.println("Successful data transmission");
    } else {
      Serial.println("ERROR in data transmission");
      Serial.println(error);  // Print error code
    }
  }
}

// Debounce function for button press detection
bool is_debounced_press(int switch_pin) {
  int reading = digitalRead(switch_pin);  // Read current button state

  // If button state changed → reset debounce timer
  if (reading != last_switch_state) {
    last_debounce_time = millis();
  }
  last_switch_state = reading;  // Update last read state

  // If stable longer than debounce delay(50ms) → update confirmed state
  if ((millis() - last_debounce_time) > debounce_delay) {
    if (reading != current_switch_state) {
      current_switch_state = reading;

      // Return true if stable state is button press (LOW)
      if (current_switch_state == 0) {
        last_switch_state = reading;
        return true;
      }
    }
  }

  return false;  // No valid press detected
}
Code Explanation
- Setup phase
- ESP32 is configured as an I2C master.
- A push-button is set as an input with an internal pull-up.
- Internal pull-ups/pull-downs on SDA and SCL are disabled to rely only on external pull-ups.
- Loop phase
- The function
is_debounced_press()checks the push-button input:- If the button changes state, a timer starts.
- If the state remains stable for >50 ms (debounce delay), the press is considered valid.
- A valid press is detected only when the button is LOW (pressed).
- The function
- On a valid button press
- The variable ledState toggles (0 → 1 → 0 …).
- This value (ON/OFF) is sent to the slave device using I2C.
- Transmission check
- If I2C communication succeeds (error == 0), a success message is printed.
- Otherwise, an error code is displayed.
B) ESP32 as Slave
Circuit Connection
- Interface LED with GPIO pin 2 with a Current-limiting resistor of 150 ohms.
- Place 4.7 kΩ pull-up resistors between VCC and each of the SDA and SCL lines.
- Interface push button switch to the GPIO pin of the Master controller.
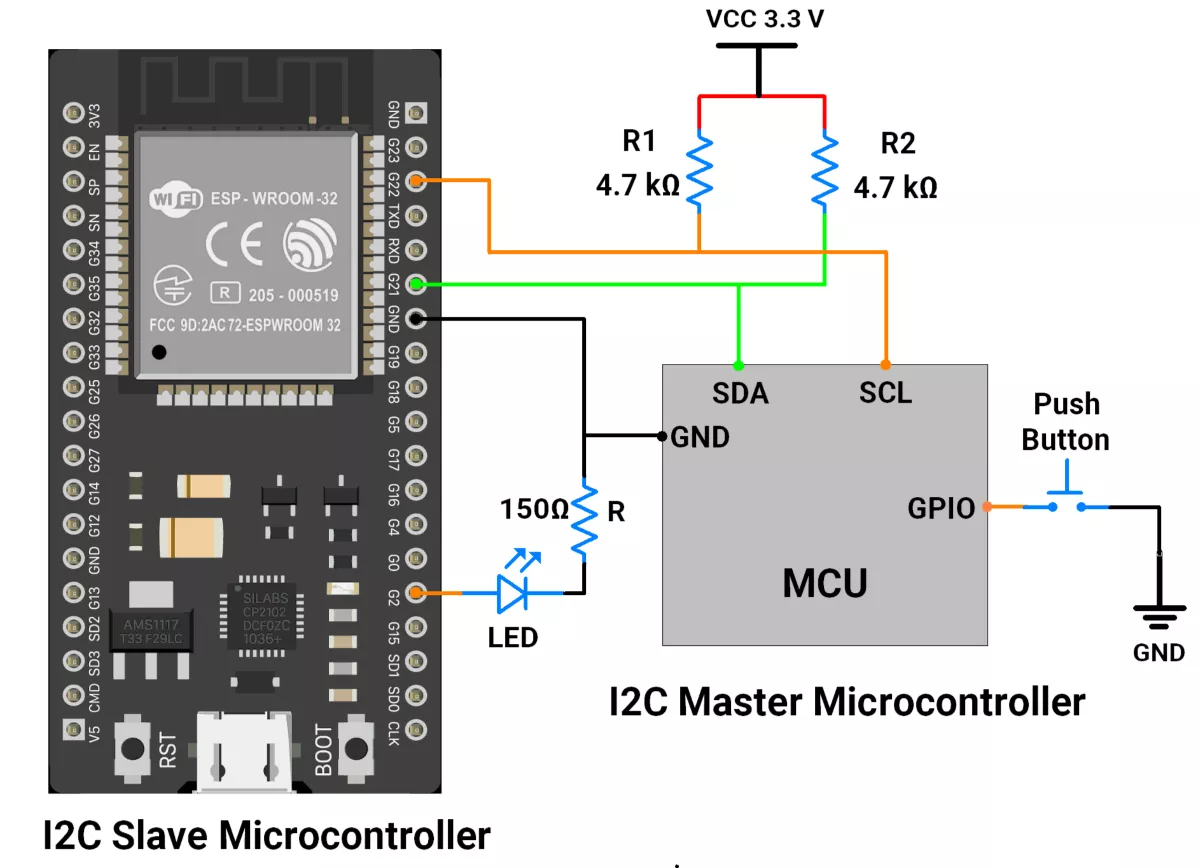
Firmware Implementation
- The I²C slave can be any microcontroller (e.g., Arduino UNO, ESP32, STM32) programmed with the same slave address (0x08)—only the master code changes.
Code
#include "Wire.h"

#define I2C_DEV_SLAVE_ADDR 0x08 // I2C slave address
#define LED_PIN 2               // LED connected to GPIO 2

// Callback: runs when master sends data
void onReceive(int len) {
  while (Wire.available()) {
    uint8_t received = Wire.read();   // Read received byte

    // Control LED based on received value
    if (received == 1) {
      digitalWrite(LED_PIN, HIGH);    // Turn LED ON
    } else if (received == 0) {
      digitalWrite(LED_PIN, LOW);     // Turn LED OFF
    }
  }
}

// Disable ESP32’s internal pull-ups/pull-downs on I2C pins
void ensureNoInternalPullups(int sda = 21, int scl = 22) {
  gpio_pullup_dis((gpio_num_t)sda);
  gpio_pulldown_dis((gpio_num_t)sda);
  gpio_pullup_dis((gpio_num_t)scl);
  gpio_pulldown_dis((gpio_num_t)scl);
}

void setup() {
  Serial.begin(115200);                // Start serial monitor
  Serial.setDebugOutput(true);         // Enable debug output (optional)
  Wire.onReceive(onReceive);           // Register receive event handler
  Wire.begin((uint8_t)I2C_DEV_SLAVE_ADDR); // Start I2C in slave mode
  ensureNoInternalPullups();           // Disable internal pulls
  pinMode(LED_PIN, OUTPUT);            // Set LED pin as output
}

void loop() {
  // Nothing here; slave responds only when master sends data
}
Code Explanation
- The ESP32 is set up as an I²C slave with address 0x08.
onReceiveis a callback function that runs automatically whenever the master sends data.- The slave reads the received byte:
- If 1 → LED turns ON.
- If 0 → LED turns OFF.
- Main
loop()does nothing because the slave only reacts when data arrives from the master.
We are using the Arduino UNO development board and programming it using the Arduino IDE.
- Before uploading, make sure to select “Arduino UNO” as the board to ensure correct settings and compatibility.
In both Arduino UNO master and slave codes, the Wire.h library is used for I²C communication.
I²C Pins Of Arduino UNO
- SDA → A4
- SCL → A5
Solution of the given task:
- Arduino UNO as Master
- Arduino UNO as Slave
A) Arduino UNO as a master
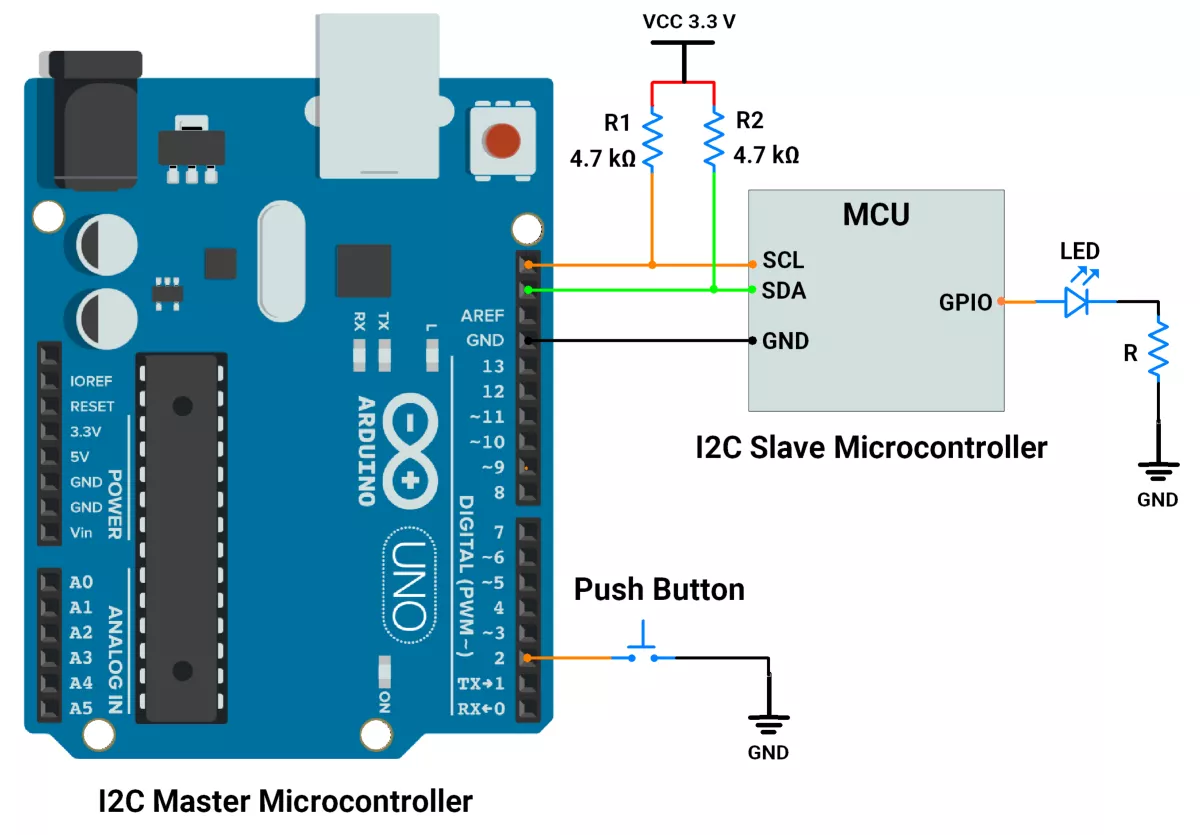
First, let's establish the hardware connection.
Hardware Connection
- Interface push button switch to GPIO pin 2.
- Place 4.7 kΩ external pull-up resistors between VCC and each of the SDA and SCL lines.
- Interface the LED to the slave device with a current-limiting resistor.
Circuit Diagram
CODE
#include <Wire.h>

#define slaveAddress 0x08  // slave address
#define switchPin 2
uint8_t ledState = 0;  // LED state
uint8_t error;

unsigned long debounce_delay = 50;     // Debounce delay in milliseconds
int last_switch_state = 1;             // Previous switch state
int current_switch_state = 1;          // Current switch state
unsigned long last_debounce_time = 0;  // Timestamp of the last switch state change

void setup() {
  Serial.begin(115200);

  // Initialize arduino as I2C master
  Wire.begin();

  // Disable internal pull-ups on SDA/SCL
  pinMode(A4, INPUT);        // SDA
  pinMode(A5, INPUT);        // SCL
  digitalWrite(A4, LOW);     // ensure pull-up is off
  digitalWrite(A5, LOW);     // ensure pull-up is off

  pinMode(switchPin, INPUT_PULLUP);
}

void loop() {
  // check if switch is pressed or not
  if (is_debounced_press(switchPin)) {
    ledState = !(ledState);
    Wire.beginTransmission(slaveAddress);
    Wire.write(ledState);                     // Store the state of LED in i2c buffer
    error = Wire.endTransmission();           // send data to slave
    if (error == 0) {
      Serial.println("Successful data transmission");
    } else {
      Serial.println("ERROR in data transmission");
    }
  }
}


bool is_debounced_press(int switch_pin) {
  int reading = digitalRead(switch_pin);

  // If the button state has changed, reset the debounce timer
  if (reading != last_switch_state) {
    last_debounce_time = millis();
  }

  last_switch_state = reading;  // Update the previous state

  // If the button state is stable for longer than the debounce delay, update the state.
  if ((millis() - last_debounce_time) > debounce_delay) {
    if (reading != current_switch_state) {
      current_switch_state = reading;

      // Return true if the button is pressed (LOW state)
      if (current_switch_state == 0) {
        last_switch_state = reading;
        return true;
      }
    }
  }

  return false;  // No valid press detected
}
Code Explanation (Master)
Wire.begin(): Initializes the Arduino as I²C master.- Disable Internal Pull-ups:
Because external 4.7 kΩ pull-ups are used for SDA and SCL. - Debounce Logic:
is_debounced_press()ensures that noise or mechanical bounce does not cause multiple false triggers. - Data Transmission:
- When button press is confirmed, toggle
ledState. - Use
Wire.beginTransmission(slaveAddress)to start communication with the slave. Wire.write(ledState)sends the new LED state (0 or 1).Wire.endTransmission()completes the transaction and returns an error code (0 = success).
- When button press is confirmed, toggle
B) Arduino UNO as a slave
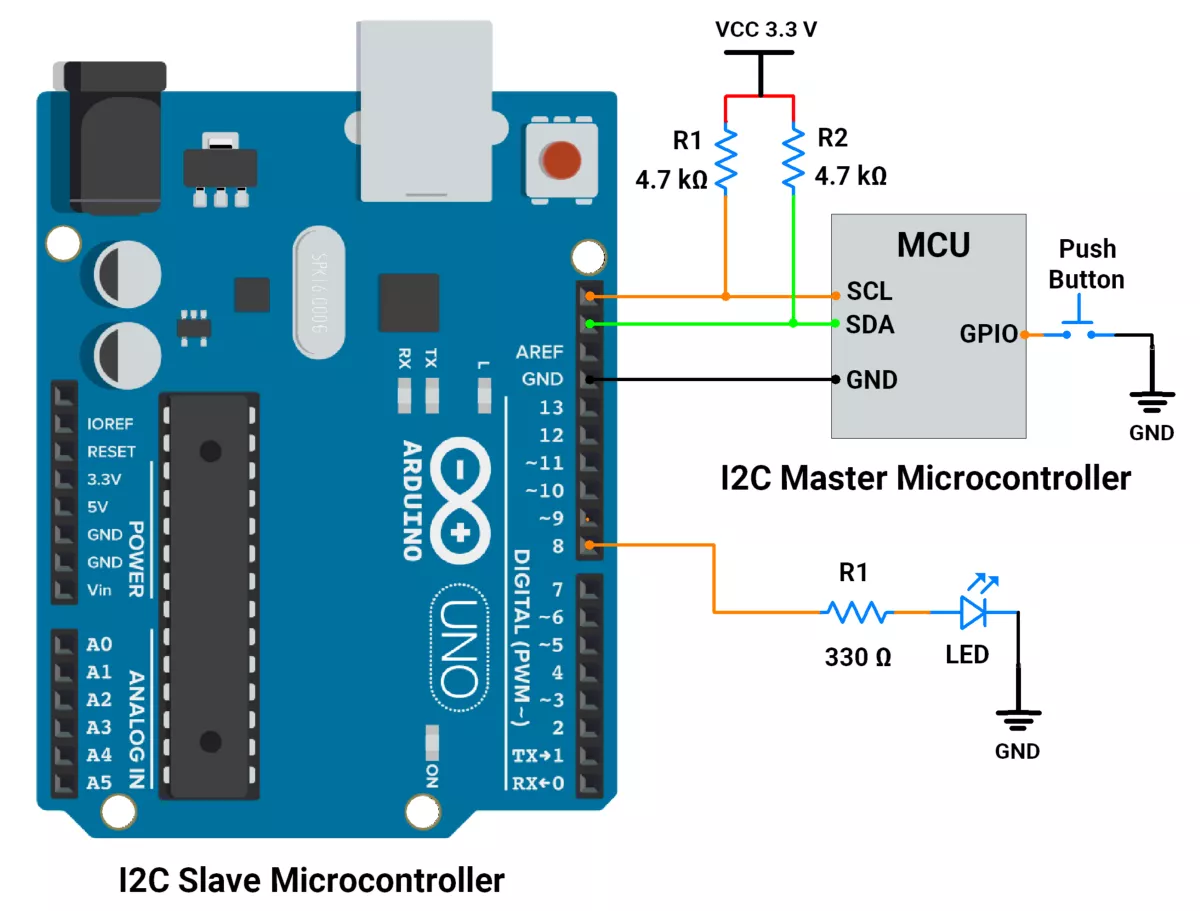
First, let's establish the hardware connection.
Hardware Connection
- Interface LED with GPIO pin 8 with a Current-limiting resistor of 330 ohms.
- Place 4.7 kΩ external pull-up resistors between VCC and each of the SDA and SCL lines.
- Interface push button switch to the GPIO pin of the Master controller.
Circuit Diagram
Code
#include <Wire.h>

#define ledPin 8
#define slaveAddress 0x08

void setup() {
  // Initialize arduino as I2C slave (Slave address is 0x08)
  Wire.begin(slaveAddress);

  // Disable internal pull-ups on SDA/SCL
  pinMode(A4, INPUT);        // SDA
  pinMode(A5, INPUT);        // SCL
  digitalWrite(A4, LOW);     // ensure pull-up is off
  digitalWrite(A5, LOW);     // ensure pull-up is off

  Wire.onReceive(receiveEvent);  // Attach a function to handle incoming data

  pinMode(ledPin, OUTPUT);
}

void loop() {
}

// Function to handle incoming data
void receiveEvent(int bytes) {
  while (Wire.available()) {
    int received = Wire.read();  // Read the incoming byte
    if (received == 1) {
      digitalWrite(ledPin, HIGH);
    } else if (received == 0) {
      digitalWrite(ledPin, LOW);
    }
  }
}
Code Explanation (Slave)
Wire.begin(slaveAddress):Sets the device as an I²C slave with address 0x08.- Disable Internal Pull-ups:
Because external 4.7 kΩ pull-ups are used for SDA and SCL. Wire.onReceive():Registers the functionreceiveEvent()to handle incoming data.receiveEvent(int bytes):- Reads data sent by master using
Wire.read(). - If 1 → LED ON; if 0 → LED OFF.
- Reads data sent by master using
OUTPUT
Hardware Setup
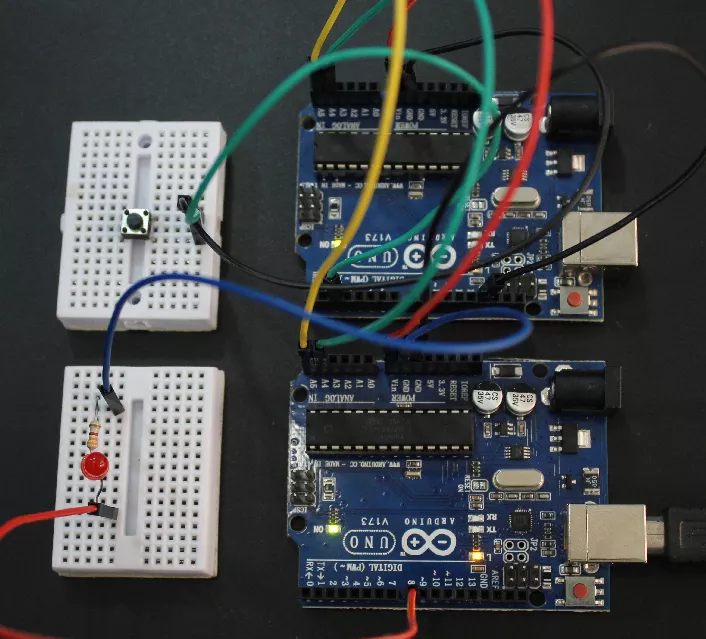
Output Video