
74. Sleep Mode with Periodic Wake-Up
The task is to create a low-power system that wakes every 1 minute to read ADC, print the value, and return to sleep using an accurate, power-efficient wake-up method.
Functional Requirements
1. Accurate 1-Minute Wake-Up
The system must wake up every 60 seconds with minimal time error.
Possible wake-up sources:
- RTC (Real-Time Clock):
Highest accuracy, good for long-term timing, slightly higher power use. - Low-Power Timer:
Internal to MCU, good balance between accuracy and power. - Watchdog Timer (Periodic Mode):
Lowest cost, moderate accuracy, may drift over time. - External Timer/Clock Chip:
Very accurate, but adds extra cost and power consumption.
2. Low-Power Operation
During idle time, the MCU must enter the lowest supported power mode, such as:
STOP / STANDBY / DEEP-SLEEP / POWER-DOWN (based on MCU family).
3. Stable ADC and UART Operation
After waking up
- Restore system clocks
- Enable ADC and UART
- Wait briefly for stabilisation
- Then read the ADC value and send it to the serial terminal
4. Fixed Task Sequence
The system must always follow the same operation order:
Wake → Measure (ADC) → Transmit → Sleep
No steps should be skipped or executed out of order.
5. Reliable Recovery
If the system resets or faces power glitches:
- It must restart cleanly
- It must continue the same 1-minute cycle without errors
Key Implementation Notes (Best Practices)
Wake-Up Source Selection
- RTC
- Very accurate
- Good for long-term timing
- Slightly higher power
- Low-Power Timer
- Internal
- Easy to configure
- Balanced power + accuracy
- Watchdog Timer
- Lowest cost
- Moderate accuracy
- Time drift increases over long periods
- External Clock / Timer
- Highest accuracy
- Increases hardware cost and power usage
- RTC
Peripheral & Power Handling
- Enable ADC and UART only when needed
- Disable UART after transmission
- Configure unused GPIOs with pull-up/down to avoid leakage
- Turn off unused clocks and peripherals
- Enable Brown-Out Detection (BOD) for safe low-voltage operation
So, by considering the above points, we can implement the task.
Below are the solutions to the given task using different microcontrollers
- ESP32
- Arduino UNO
We are using the ESP32 DevKitC v4 development board and programming it using the Arduino IDE.
- Before uploading, make sure to select “ESP32 Dev Module” as the board to ensure correct settings and compatibility.
ESP32 Sleep Modes
ESP32 supports multiple sleep modes to save power. Deep sleep is ideal for this task because it consumes very little power and can wake the controller after a specific time.
| Powe Mode | Description | Power Consumption |
| Active (RF Working) | Wi-Fi and Bluetooth ON | 95-240 mA |
| Modem Sleep | CPU ON | Max Speed: 20mA |
| Normal: 5-10mA | ||
| Slow: 3mA | ||
| Light Sleep | - | 0.8 mA |
| Deep Sleep | ULP ON | 150 uA |
| RTC Timer+ RTC Memory | 10 uA | |
| Hibernation | RTC timer only | 5 uA |
| Power Off | - | 0.1 uA |
In the ESP32 deep sleep mode
- RTC controller, RTC memory, and ULP coprocessor remain active.
- All other components, such as CPU, Wi-Fi, Bluetooth, and most peripherals, are powered off.
The ESP32 RTC controller has a built-in timer. In the given task, we will use the RTC timer to wake up the controller from deep sleep mode after a predefined amount of time.
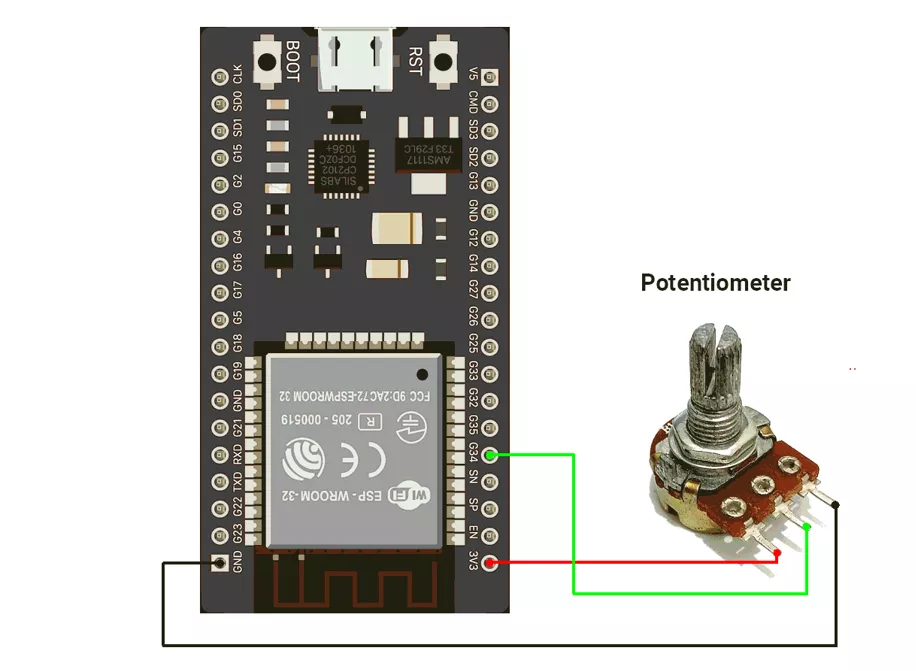
Circuit Connection
- Interface potentiometer to GPIO pin 34.
Firmware Implementation
Code
#include <esp_sleep.h>

#define ADC_PIN 34            // ADC1 channel (input-only)
const uint64_t uS_TO_S_FACTOR = 1000000ULL;
const uint64_t SLEEP_SECONDS = 60; // 1 minute

void setup() {
  Serial.begin(115200);
  delay(100); // allow Serial to start

  // Read ADC after every wake
  int adcValue = analogRead(ADC_PIN);         // 0..4095 (12-bit)
  Serial.print("ADC value: ");
  Serial.println(adcValue);

  // Configure RTC timer wakeup for next cycle
  esp_sleep_enable_timer_wakeup(SLEEP_SECONDS * uS_TO_S_FACTOR);

  Serial.println("Entering deep sleep for 60 seconds...");
  Serial.flush();
  esp_deep_sleep_start();
}

void loop() {
  // never reached after esp_deep_sleep_start()
}
Code Explanation
- First, we define the ADC pin as GPIO34, which is input-only and suitable for analog readings.
- We set a conversion factor
uS_TO_S_FACTOR = 1000000ULL, since the wakeup function requires time in microseconds. - The sleep duration is set as
SLEEP_SECONDS = 60, meaning the ESP32 will sleep for 1 minute before waking. - Inside setup():
- Start the Serial Monitor with
Serial.begin(115200)and add a short delay. - After each wakeup, read the ADC value from GPIO34 (
analogRead(ADC_PIN)) and print it. - Configure a timer wakeup for 60 seconds using
esp_sleep_enable_timer_wakeup().
- Start the Serial Monitor with
- Print a message, flush the Serial buffer, and prepare for deep sleep.
- Finally,
esp_deep_sleep_start()is called, which puts the ESP32 into Deep Sleep Mode. - The CPU and peripherals are powered down, and the program restarts from
setup()after the timer expires. - The
loop()function is never executed because the ESP32 always resets intosetup()after deep sleep
Power Saving Analysis
- Active Mode Consumption: ~50 mA.
- Sleep Mode Consumption: ~10 mA.
- Power Reduction: A Significant decrease in the current draw by enabling sleep mode.
- Conclusion: Implementing sleep mode enhances energy efficiency.
Note: The analysis was performed using a USB voltage/current meter. Due to the additional peripherals present on the development board, the measured values are higher than the theoretical power consumption of the ESP32 chip alone.
We are using the Arduino UNO development board and programming it using the Arduino IDE.
- Before uploading, make sure to select “Arduino UNO” as the board to ensure correct settings and compatibility.
To achieve power efficiency and time accuracy, we will use Timer1, which is both power-efficient and provides accurate timing for periodic wake-ups.
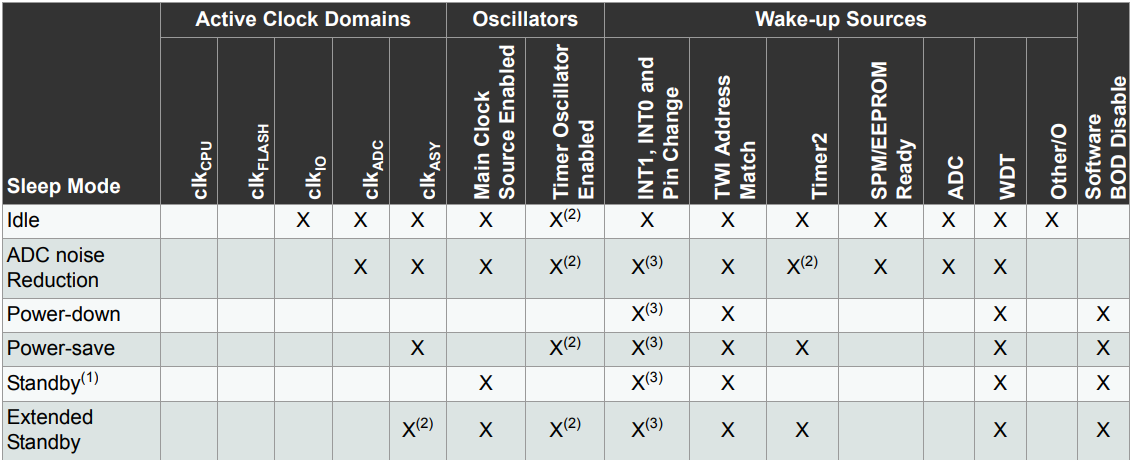
The Arduino UNO (ATmega328P) supports six sleep modes, each offering different power-saving levels:
- IDLE Mode – The CPU stops, but peripherals (Timer, ADC, Serial, etc.) keep running, allowing for a fast wake-up with minimal power saving.
- ADC Noise Reduction Mode – Reduces noise for ADC conversions by stopping the CPU and some peripherals.
- Power-down Mode – Provides maximum power saving, halting all clocks except asynchronous modules. Only external interrupts, watchdog reset/interrupt, brown-out reset, 2-wire serial interface match, INT0/INT1 level interrupt, or pin change interrupts can wake the MCU.
- Power-save Mode – Similar to Power-down but keeps Timer2 running for periodic wake-ups.
- Standby Mode – Like Power-down, but with an active oscillator for faster wake-up.
- Extended Standby Mode – Same as Standby, but keeps Timer2 running for periodic tasks.
Given the need for periodic wake-ups with precise timing, we will use IDLE Mode, which allows Timer1 to trigger interrupts for periodic wake-ups while keeping the system in a low-power state. This balances power efficiency with accurate timing for the task.
Here is a comparison of all sleep modes available in the Arduino UNO (ATmega328P):
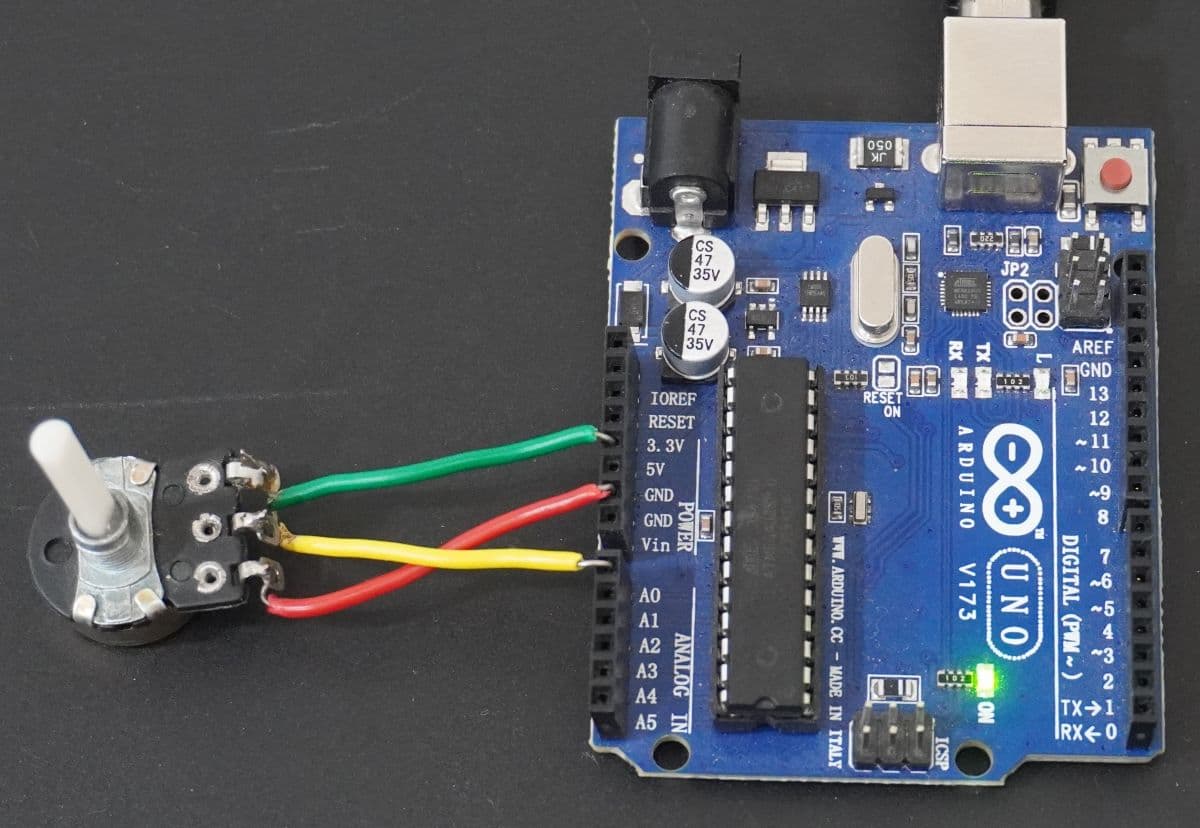
Hardware connection
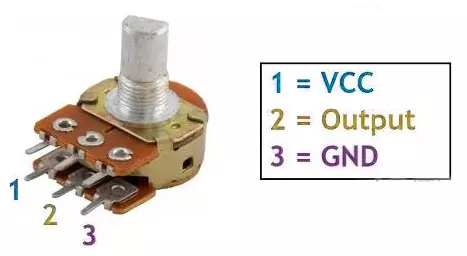
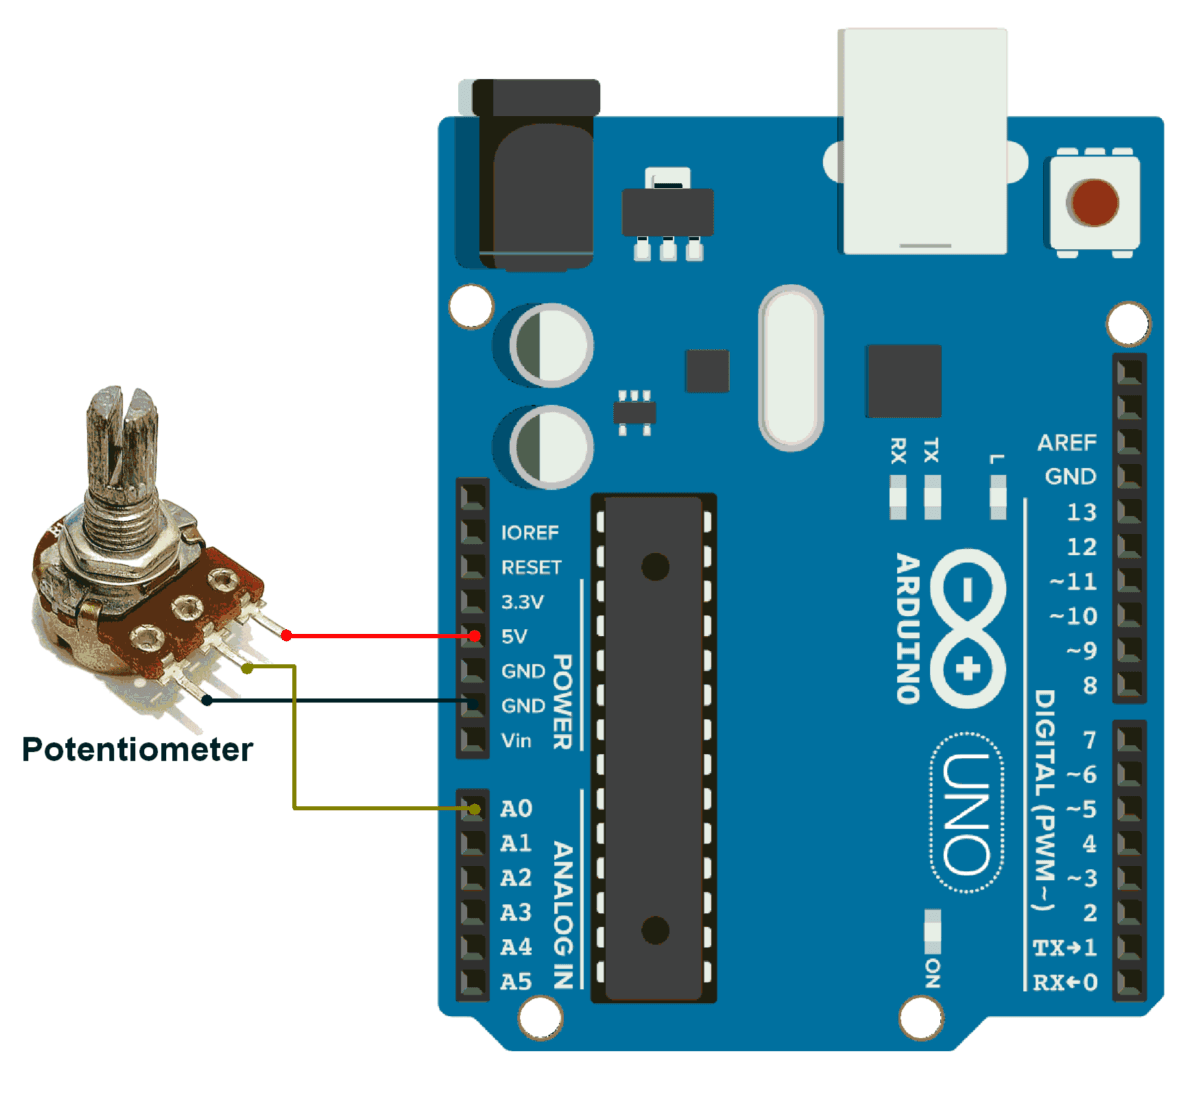
- Connect the Arduino UNO board to the PC using a USB cable to establish communication with the Serial Monitor.
- Potentiometer:
- Terminal 1 → Vcc.
- Terminal 2 → Pin A0.
- Terminal 3 → GND.
Hardware Circuit Connection
Firmware
The system is implemented using sleep modes and timer interrupts to ensure efficient power management.
To achieve a 1-minute time-based event, a watchdog timer can be used. However, it has an accuracy of 10%. It will be very inaccurate.
Thus, we will utilize Timer1, which has a duration limit of approximately 4 seconds per cycle. Therefore, the system performs 15 wake-up cycles (15 × 4s = 60s) before executing the main task.
🔹 Timer1 Configuration (CTC Mode)
- Timer1 is set to CTC (Clear Timer on Compare Match) mode.
- Uses a 1024 prescaler with
OCR1Aset to 62500, generating an interrupt approximately every 4 seconds. - The ISR (Interrupt Service Routine) increments a counter to track elapsed time.
🔹 Sleep Mode (Idle Mode)
- The system enters Idle Mode, where the CPU sleeps, but Timer1 remains active.
- Only essential peripherals stay ON, while ADC, SPI, I2C, and unused timers are disabled to save power.
🔹 Wake-Up and ADC Measurement
- Every 4 seconds, the system wakes up, increments a counter, and returns to sleep.
- After 15 cycles (1 minute total), the system reads the ADC value from the potentiometer and prints it to the Serial Monitor.
This approach ensures accurate timing while optimizing power consumption.
Code
#include <avr/sleep.h>      // Library for sleep modes
#include <avr/interrupt.h>  // Library for interrupts
#include <avr/power.h>      // Library for power management

volatile uint8_t sleepCounter = 0;  // Counts 4-second intervals for a total of 60 seconds

// Function to configure Timer1 in CTC mode to wake up the CPU every 4 seconds
void setupTimer1() {
  cli();  // Disable global interrupts while configuring

  TCCR1A = 0;                                         // Set Timer1 to Normal mode
  TCCR1B = (1 << WGM12) | (1 << CS12) | (1 << CS10);  // CTC Mode, Prescaler = 1024

  OCR1A = 62500;           // Compare Match A value for 4-second interval (16MHz clock)
  TIMSK1 = (1 << OCIE1A);  // Enable Timer1 Compare Match A interrupt

  sei();  // Enable global interrupts
}

// Function to disable all unnecessary peripherals to save power
void disableUnusedPeripherals() {
  power_adc_disable();     // Disable ADC (Analog to Digital Converter)
  power_spi_disable();     // Disable SPI (Serial Peripheral Interface)
  power_twi_disable();     // Disable TWI (I2C)
  power_timer0_disable();  // Disable Timer0 (Used for delay and millis functions)
  power_timer2_disable();  // Disable Timer2 (Used for PWM on pins 3 and 11)
                           // Note: Timer1 remains enabled as it's used for wake-up
}

// Function to put the MCU into sleep mode (Idle mode)
void enterIdleMode() {
  delay(10);                   // Short delay before entering sleep mode
  disableUnusedPeripherals();  // Disable unused peripherals to save power

  noInterrupts();  // Disable interrupts while configuring sleep

  set_sleep_mode(SLEEP_MODE_IDLE);  // Set CPU to Idle mode (Timer1 remains active)
  sleep_enable();                   // Enable sleep mode

  interrupts();  // Re-enable interrupts

  sleep_mode();  // Put CPU to sleep (execution pauses here)

  // Execution resumes here after wake-up
  sleep_disable();     // Disable sleep mode after waking up
  power_all_enable();  // Re-enable all peripherals
}

void setup() {
  Serial.begin(115200);
  pinMode(13, OUTPUT);
  digitalWrite(13, LOW);  //Turning off the on board LED for power saving
  Serial.println("System Initialized.");

  setupTimer1();  // Initialize Timer1 for periodic wake-ups
}

void loop() {
  enterIdleMode();  // Enter Idle Mode (CPU sleeps, wakes up every 4 seconds)

  // Every 15 wake-up cycles (~60 seconds), read ADC and print the value
  if (sleepCounter == 15) {
    int adcValue = analogRead(A0);  // Read ADC value
    Serial.print("ADC Value: ");
    Serial.println(adcValue);  // Print ADC value
    sleepCounter = 0;          // Reset counter for the next 60-second cycle
    delay(10);                 // Short delay to stabilize
  }
}

// Timer1 Compare Match Interrupt (Executes every 4 seconds, wakes CPU)
ISR(TIMER1_COMPA_vect) {
  sleepCounter++;  // Increment counter every 4 seconds
  TCNT1 = 0;       // Reset Timer1 counter
}
Code Explanation
Setup Function (setup()):
- Initialize Serial communication (
Serial.begin(115200)). - Configure Timer1 (
setupTimer1()) for 4-second interrupts.
Timer1 Configuration (setupTimer1()):
- Disable global interrupts (
cli()) to prevent setup conflicts. - Set CTC mode (
WGM12 = 1) for precise timing. - Use a prescaler of 1024 and set
OCR1A = 62500for a 4-second interval. - Enable Timer1 Compare Match Interrupt (
TIMSK1 |= (1 << OCIE1A)). - Re-enable interrupts (
sei()).
Power Optimization (disableUnusedPeripherals()):
- Disable unused peripherals (ADC, SPI, I2C, Timer0, Timer2).
- Keep Timer1 active for periodic wake-ups.
Entering Sleep Mode (enterIdleMode()):
- Set Idle Mode to keep Timer1 running while CPU sleeps.
- Call
sleep_mode()to pause execution until an interrupt occurs. - After wake-up, disable sleep and re-enable peripherals.
Main Loop (loop()):
- Enter Idle Mode for low power.
- Every 15 wake-ups (approx. 60 seconds), read and print the ADC value.
Timer1 Compare Match Interrupt (ISR(TIMER1_COMPA_vect)):
- Triggered every 4 seconds, incrementing a counter to track elapsed time and trigger ADC reading every 60 seconds.
Output
Power Saving Analysis
- Active Mode Consumption: 27-30 mA.
- Sleep Mode Consumption: 19-22 mA.
- Power Reduction: Significant decrease in the current draw by enabling sleep mode.
- Conclusion: Implementing sleep mode enhances energy efficiency.
Hardware Setup
Serial Monitor output
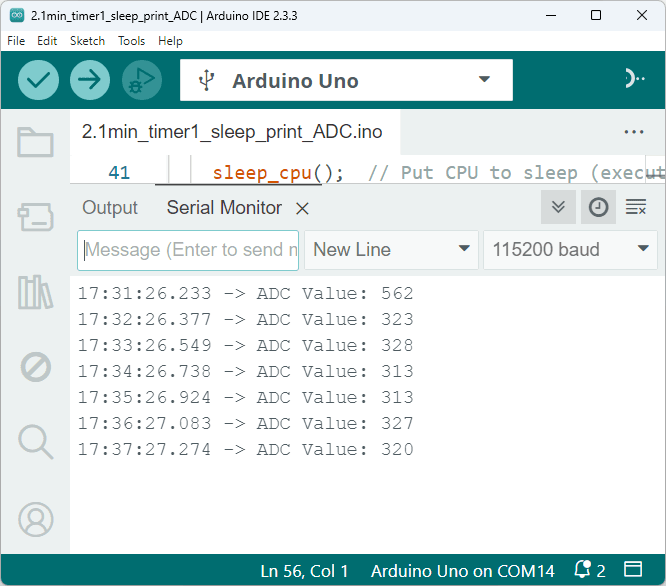
ADC values are printing after every 1 minute
Video